JUnit 5 is the new testing platform from Java, which consists of the following components. It requires Java 8 or above version.
JUnit Platform – It serves as a foundation for launching a testing framework on JVM. It also defines TestEngine API for developing a testing framework that runs on the platform.
JUnit Jupiter – It is the combination of the new extension for writing tests and extensions in JUnit 5.
JUnit Vintage – It provides a TestEngine for running JUnit 3 and JUnit 4 based tests on the platform.
Introduction:
In this article, I will explain the major new features of JUnit 5. To execute the test case, I have taken a simple application which is explained in the below section. I will walk through the test cases I added during that I will explain those features.
About the application: The application is built using spring boot. It has a data access layer and the service layer. It does not have any controller as I mainly used this to demo test cases. It is a gradle based project. Here I have excluded junit4 and added junit5 using following snippet.
testImplementation('org.springframework.boot:spring-boot-starter-test') {
     exclude group: 'junit', module: 'junit'
 }
 testImplementation('org.junit.jupiter:junit-jupiter:5.5.1')
- It has CRUD operation on employee DB. The employee has email, first name, last name.
- On saving employee, it validates email of the employee.
- While updating employee, it throws an error if given id of employee object is 0, if given employee uses email of another employee, if given email of an employee is not present. It permits to change firstname and last name only.
- It fetches employee with id or gets all employees.
- Deletes an employee by id.
- Here I will be writing an integration test which interacts with DB and it uses spring context. Here are changes need in JUnit 5.
- In JUnit4, we used to have “@RunWith(SpringRunner.class)”, but in jUnit5, it is replaced extension model, we have to annotate with “@ExtendWith(SpringExtension.class)”.
- Here we have “BeforeEach”, “BeforeAll” , “AfterEach”, “AfterAll” annotation for testcase pre and postcondition. Name itself is intuitive to understand the purpose.
Following are some of the features of JUnit 5.
Lambda support in the assertion:
This facilitates to have a single assertion (assertAll) which can contain multiple assertions to evaluate individual conditions. Following is the snippet I have used for asserting all attributes of user.
@DisplayName("Valid employee can be stored")
 @Test
 public void validEmployeeCanBeStoredTest() throws EmployeeException {
   Employee savedEmployee = employeeService.save(employee);
   assertAll("All user attribute should be persisted",
       () -> assertEquals(employee.getFirstName(), savedEmployee.getFirstName(), "Firstname matched"),
       () -> assertEquals(employee.getLastName(), savedEmployee.getLastName(),"Lastname matched"),
       () -> assertEquals(employee.getEmail(), savedEmployee.getEmail(), "Email matched"),
       () -> assertTrue(savedEmployee.getId() > 0,"Employee ID generated"));
 }
Here you can see that using a single assertAll we can have a different type of assertions.
Note: DisplayName helps to get some descriptive information about the test case like following.

Parameterize test
It facilitates to run a testcase multiple times with different arguments. Instead of @Test, it is annotated with @ParameterizedTest. It must declare at least one source of the parameter for the argument. Here is some valid source type – “ValueSource”, “Null Empty Source”, “EnumSource”, “MethodSource”, “CsvSource”, “CsvFileSource”, “ArgumentSource”.
I will explain about ValueSource and MethodSource, rest all are not in the scope of this article and I might cover them in a separate article. Following is the snippet which I used for testing valid and invalid emails. You might have guessed it since we have to test it multiple times with different value this comes to be a good candidate to demonstrate.
@Tag("unit")
 class InvalidEmailTest {

   @DisplayName("Test with valid")
   @ParameterizedTest(name = "email = {0}")
   @ValueSource(strings = { "this@email.com", "email.example@example.com", "demo@local.co.in" })
   void validEmails(String email) {
     assertTrue(EmailValidator.isValidEmail(email));
   }

   @DisplayName("Test with invalid")
   @ParameterizedTest(name = "email = {0}")
   @MethodSource("invalidEmailsProvider")
   void invalidEmails(String email) {
     assertFalse(EmailValidator.isValidEmail(email));
   }

   private static Stream<String> invalidEmailsProvider() {
     return Stream.of("this@email", "email@example.", "local.co.in");
   }

 }
ValueSource is pretty much straight forward, here we need to pass a different value as an array, and it will automatically pass to test method.
MethodSource helps to customize the arguments using Stream. It helps to pass a complex object to the method.
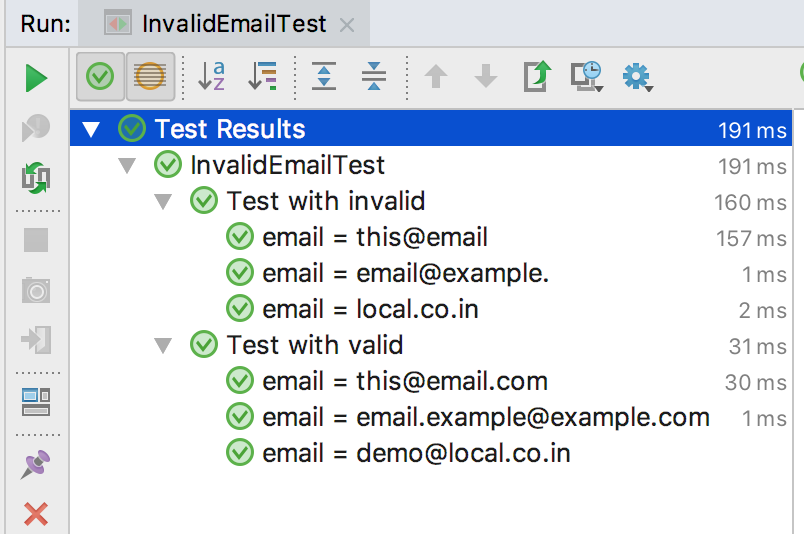
Note: Here we don’t have a display name, rather we have specified it as “@ParameterizedTest(name = “email = {0}”)”, it will help to nicely show the testcase execution like following.
Nested test case
It helps to build a kind of test suite which contains more meaningful and related group of the test in single class. Here is the code snippet.
@Transactional
 @SpringBootTest()
 @ExtendWith(SpringExtension.class)
 @DisplayName("Invalid employee test")
 @Tag("integration")
 class InvalidEmployeeCreateTest {

   private Employee employee;

   @Autowired
   EmployeeService employeeService;

   @Nested
   @DisplayName("For invalid email") class ForInvalidEmail {

     int totalEmployee = 0;

     @BeforeEach
     void createNewEmployee() {
       totalEmployee = employeeService.findAll().size();
       employee = new Employee("TestFirstName", "TestLastName", "not-an-email");
     }

     @Test
     @DisplayName("throws invalid email exception")
     void shouldThrowException() {
       assertThrows(EmployeeException.class, () -> employeeService.save(employee));
     }

     @Nested
     @DisplayName("when all employee fetched") class WhenAllEmployeeFetched {

       @Test
       @DisplayName("there should not be any new employee added")
       void noEmployeeShouldBePresent() {
         assertTrue(employeeService.findAll().size() == totalEmployee, "No new employee present");
       }
     }
   }
 }
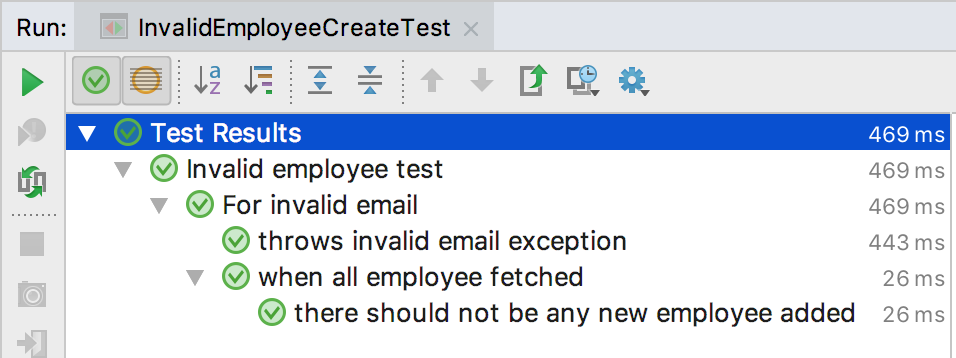
Here is the output for this.

Explanation:
It starts with ForInvalidEmail nested class, it contains “BeforeEach” which is invoked before each of test case, there we are creating an employee object which contains an invalid email. This class contains single test method “shouldThrowException” which checks if we try to save that employee object it should throw an exception.
In “ForInvalidEmail” nested class, I have added one more nested class named “WhenAllEmployeeFetched”. This nested class contains a method which ensures no new employee record is created.
Here, you can see that how we grouped 2 related tests ( should throw an exception and no employee should be added) using nested class.
Dynamic Test
Earlier, we have only @Test which is static and specified at compile time. Their behavior can’t be changed in runtime. In junit5, new annotation is added for this @TestFactory. It is factory of the test case, and it must return a single DynamicNode or Stream instance.
Any Stream returned by a @TestFactory will be properly closed by calling stream.close(), making it safe to use a resource such as Files.lines().
As with @Test methods, @TestFactory methods must not be private or static and may optionally declare parameters to be resolved by ParameterResolvers.
A DynamicTest is a test case generated at runtime. It is composed of a display name and an Executable. Executable is a @FunctionalInterface which means that the implementations of dynamic tests can be provided as lambda expressions or method references.
Following is the code snippet using this.
@Transactional
 @SpringBootTest()
 @ExtendWith(SpringExtension.class)
 @Tag("integration")
 class EmployeeUpdateTest {

   private List<Employee> employees = Arrays.asList(
       new Employee("valid", "name", "email1@exmaple.com", 1),
       new Employee("invalid", "id", "email2@exmaple.com", 0), // Invalid employee
       new Employee("uses", "other email", "email1@exmaple.com", 3), // Invalid as it uses 1st employee email
       new Employee("email", "does not exist", "email4@exmaple.com", -1)); // Non-existent email can't be updated
   @Autowired
   EmployeeService employeeService;
   @TestFactory
   Stream<DynamicTest> dynamicEmployeeTest() {
     return employees.stream()
         .map(emp -> DynamicTest.dynamicTest(
             "Update Employee: " + emp.toString(),
             () -> {
               try {
                 assertNotNull(employeeService.update(emp));
               } catch (EmployeeException e) {
                 assertTrue(e.getMessage().toLowerCase().contains("error:"));
                 assertTrue(emp.getId() != 1); // All employee except 1 should fail
               }
             }
         ));
   }
 }
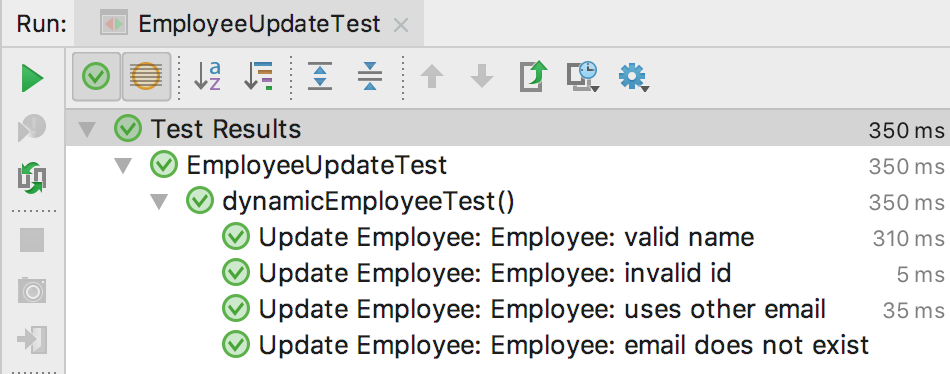
Explanation: Here we have dynamicEmployeeTest method which is annotated with @TestFactory and it returns stream of DynamicTest. As you can see, here we have a mix of some employees, where only 1 record is valid for update, rest all employees have some problems mentioned in the code comment. This dynamic method actually emits 4 test case for which 1st employee goes through try block and rest all falls through the exception block.
Advantage: It shortens the codebase to test. Using JUnit 4, we have to write 4 different test cases to verify such behaviour.
Here is the output when running from IDE.

Note: This does not follow the lifecycle of testcases as those testcases are dynamically generated. So, if you have before each / BeforeAll/ AfterEach/ AfterAll methods, those won’t be accessed or executed for testfactory methods.
Here are some more features of JUnit 5:
- Conditional test execution.
- Test Execution order
- DI for constructor and methods
- Repeated test
- Timeout test.
References:
- https://junit.org/junit5/docs/current/user-guide
- https://github.com/arindamnayak/junit5-demo/ [This repo contains the complete project]


