- Developer check-in their code changes in source control like git, svn etc.
- Jenkins triggers a job to run a build and test cases. Before each build run, it picks up the updated code from source control (git, svn etc).
- Then Jenkins creates build report with the help of plugins.
- Automatic notifications will be sent to the emails configured.
You can find different sources for Jenkins setup and its configuration. Therefore we will not dig into that part. I will share two major issues that we faced in above setup.
1 – Xcode 8 support in Jenkins
2 – XCTest fails to launch the app intermittently.
1 – Xcode 8 support in Jenkins:
Problem:
The current version of Xcode plugin in Jenkins is not able to generate proper test report if you are running test cases by using Xcode 8. It reports all test cases as a success although they contain failing tests. The reason behind this is Xcode 8 changed the way of XML of UI test report. JUnit plugin is not able to parse this XML to generate a test report. Because of this, we were not able to use Xcode 8 to run the test cases on iOS 10. This issue is already reported by many users.
Solution:
Since JUnit plugin is not able to parse the Xcode 8 test report XML, we have used XCPretty mediator that converts Xcode 8 XML report into JUnit supported XML. XCPretty creates a JUnit-style XML report which is compatible with Jenkins. Installation steps for XCPretty are mentioned in above ref link.
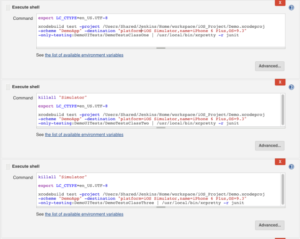
Following is the syntax to use XCPretty option with xcodebuild:
xcodebuild test -project projectPath -scheme “schemeName” -destination “platform=iOS Simulator,name=iPhone 6 Plus,OS=9.3” | /usr/local/bin/xcpretty -r junit
Above command create JUnit-style XML report at build/reports/junit.xml in your projects root directory.

You can also provide custom path for output xml file like:
xcodebuild test -project projectPath -scheme “schemeName” -destination “platform=iOS Simulator,name=iPhone 6 Plus,OS=9.3” | /usr/local/bin/xcpretty -r junit -o pathToXMLFile/JUnit.xml
To use XCPretty option with xcodebuild, we have to use “|” (pipe) but, unfortunately, this is not supported in Xcode plugin in Jenkins. So we have to use the script option instead of Xcode plugin.
We have implemented above solution to support Xcode 8 in Jenkins.
2 – XCTest fails to launch the app intermittently.
Problem:
Many of us have observed the issue that XCTest framework intermittently fails to launch the app with below error when you execute multiple test cases in a single run:
“UI Testing Failure – Failure attempting to launch: Error…..”.
This is another major issue in the implementation of CI process for iOS projects. Because above error marks the test case as failed. We have tried many solutions but, didn’t find any working solution for this.
Solution:
After playing around we were observed that if we run limited test cases, this error went down considerably. Therefore to avoid this error, we have split our test cases into small sets. For this, we have used the new option in Xcode 8 ‘-only-testing’. By using this option we can run limited test cases in Xcode project.
Syntax to run a particular test case:
xcodebuild test -project projectPath -scheme “schemeName” -destination “platform=iOS Simulator,name=iPhone 6 Plus,OS=9.3” -only-testing:target/class/testCase
Syntax to run test cases in a particular class:
xcodebuild test -project projectPath -scheme “schemeName” -destination “platform=iOS Simulator,name=iPhone 6 Plus,OS=9.3” -only-testing:target/class
In this way, we have been running multiple sets of test cases in single Jenkins job instead of running all test cases together and before execution of each set, we are terminating current running simulator instance.

With this approach, we haven’t observed above error. I hope this will help you.


