Robot Framework is considered a generic open-source test automation framework that developers can leverage for acceptance testing and acceptance test-driven development. It is pretty popular because of its easy-to-use tabular test data syntax and the keyword-driven testing approach. You can extend its testing capabilities with the help of test libraries that are implemented with Python, Java, or Dotnet. As a user, you are allowed to create new higher-level keywords from existing ones by utilizing the same syntax used for creating test cases. Overall, the framework has a rich ecosystem with various generic test libraries and tools developed as separate projects.
This blog will explain the significance of Robot Framework and how its capabilities can be leveraged to automate the GUI, API, and database. But before doing that, let’s first compare the Robot Framework with Selenium BDD Framework to understand it better.
Comparison Of Robot Framework V/s Selenium BDD Framework:
I have worked on both Selenium –BDD framework and Robot Framework. Based on that experience, I can say that Robot Frameworks is more advantageous than Selenium BDD- Framework in the following ways:
| Comparison Factor | Robot | Merit Point | Cucumber + Selenium + Rest Assured | Merit Point |
| Languages Supported | Python (preferred), Java, Dotnet | 1 | Java (popular), Javascript, Dotnet, Python | 1 |
| Ease of use | Basic programming language is sufficient for any language. You can train your manual testing team accordingly. | 1 | Should be familiar withJava & ANT/Maven, loggers and more libraries. | -1 |
| Development Time | Inbuilt keywords reduce coding time for generally used steps. | 1 | Additional coding required for generally used steps. With Java will take 20-30% more time. | -1 |
| Report, Logging and Failure Analysis | Neat logs and report that comes with a screenshot. | 1 | If you are familiar with Java then it isn’t tough. Getting the logs as good as Robot is impossible. Capturing screenshot by default doesn’t happen unless some logic is implemented. Use Log4j for a detailed logging. | -1 |
| API Automation | Do not require separate tool for API Automation. Easier to automate API. | 1 | Need to integrate with tools like Rest Assured. | -1 |
| Framework Design | It’s a readily available framework. | 1 | You have to design the framework. | -1 |
| BDD Framework Support | Writing Testcases in BDD format is much easier. Using plugins like “gherkin2robotframework” auto generates step definitions and testcases files from feature file. | 1 | You need to write feature file, step definitions and runner file explicitly. Requires more manual efforts compared to Robot. | -1 |
| Testcase Writing | Writing test case is easier in the Robot compared to the testNG. | 1 | Writing testcases takes more time as compared to Robot | -1 |
| Cross Browser Testing | Supports Chrome, Firefox, Edge Safari. | 1 | Supports Chrome, Firefox, Edge Safari | 1 |
| Setup Time | Local setup is needed when running for the first time. | -1 | Everything can be defined in POM.xml. | 1 |
| Mobile Automation | Inbuilt libraries. | 1 | Need integration with Appium. | -1 |
| Parallel Execution | Possible (using Pabot). | 1 | Possible, you can do it with Selenium Grid or on standalone machine. | 1 |
Working With Robot Framework
Robot Framework is a one stop solution for GUI, API, and DB automation. You do not need separate tools for API Automation.
- Prerequisites:
- Python 3.10.2 onwards
- Pip
- Pycharm
- Adding Packages and Plugins in PyCharm:
We need to install the following libraries for GUI, API, DB automation using PIP.
- GUI Libraries:
- selenium
- robotframework
- robotframework-seleniumlibrary
- API Libraries:
- robot framework
- requests
- robotframework-requests
- robotframework-jsonlibrary
- DB Libraries:
- RobotMongoDBLibrary
After installing these libraries, we need to add these packages in the Pycharm IDE.
Steps to add plugins, packages to Pycharm IDE:
- You need to add IntalliBot@SeleniumLibrary Patched from SettingsàPlugins

- Add installed packages for GUI, API, and DB automation from SettingsàProject Interpreter.

- Click on ‘+’ button and search required Package (GUI, API, & DB library).

- The installed package will be displayed in blue color.
Robot Framework – GUI Automation
For BDD approach in Robot Framework we need to follow the steps given below:
- Install gherkin2robotframework tool. This tool will ‘compile’ Gherkin feature files into RobotFramework test cases and scaffolding for step definitions aka user keywords.
pip install gherkin2robotframework
- Write the business logic in feature file.

- Execute the command mentioned below.
gherkin2robotframework example.feature
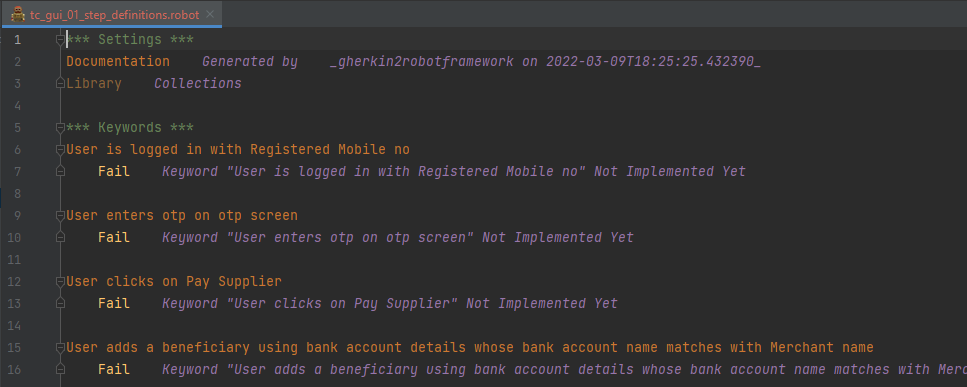
After executing the above command, two files will be generated.
- example.robot à Contains the test cases
Testcase File:

- example_step_definitions.robot à Contains the user keywords to implement the steps. Here we need to write automation logic in this file (step definitions file).
Step Definitions File:

- Command to execute testcases:
robot Testcase1.robot
Robot Framework – API Automation
For writing API test cases in BDD approach, please follow the steps mentioned in Robot Framework -GUI Automation section. Following steps need to be followed for writing API Testcases:
- Generate step definition (keywords) using steps mentioned in GUI Automation.
- Consider the example for post request:
- Create a HTTP session to a server using keyword create session.
- Create body Json using keyword create dictionary.
${body}= create dictionary name=Test accountNumber=1234567890
- Create your header using keyword create dictionary.
${header}= create dictionary Content-Type=application/json Authorization=${accessToken}
- Perform post request using following.
post request mysession ${postBeneficiaryUrl} data=${body} headers=${header}
- Assert response code using the following code.
should be equal ${response.status_code} 200
Sample API automation testcase step definition:

Robot Framework – DB Integration
For DB integration please follow the steps mentioned in Robot Framework – GUI Automation section. Following steps need to be followed for DB Automation:
- Generate step definition (keywords) using steps mentioned in GUI Automation.
- Consider DB Automation for MongoDB, mention connection string under variable section.
&{MONGODB_CONNECT_STRING}= connection=mongodb://127.0.0.1:27017/dbname?authSource=collectionname - Fetch results by using the code below:
&{RESULTS} FindOneByID ${MONGODB_CONNECT_STRING} ${idValue}
Sample DB automation code:

Parallel Execution
- For Parallel execution you need to install Pabot.
pip install robotframework-pabot
- Command to execute Parallel execution.
pabot –processes 2 –outputdir Results Output/
Where:
- –processes 2 à Indicates two testcases executing parallelly.
- –outputdir Results Output/ à Indicates results should be saved in Output directory.
Annotations equivalent to TestNg
- Test Setup – Runs before every Test Case. This is equivalent to @BeforeTest in TestNg.
- Test Teardown –Runs after every Test Case. This is equivalent to @AfterTest in TestNg.
- Suite Setup – Runs before Test Suite. This is equivalent to @BeforeSuite in TestNg.
- Suite Teardown –Runs after Test Suite. This is equivalent to @AfterSuite in TestNg.
Reporting
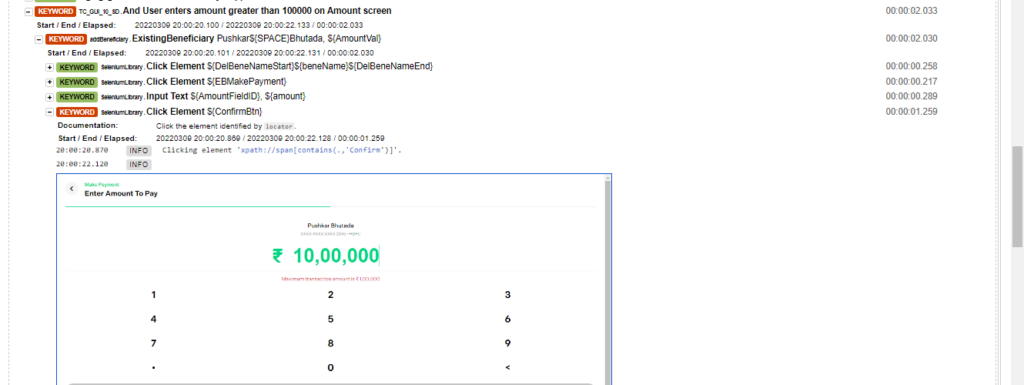
Robot Provides inbuilt support to generate testcase reports. All the neat and clean logs as well as reports that come with a screenshot. We don’t need to write separate logic for reports. Custom libraries are also available for beautification of reports.
Sample Report:

Failed screenshot captured in report:

CI/CD-Integration using Jenkins
Following steps needs to be followed for Jenkins Integration.
- Download and install Jenkins
- Create Free Style project in Jenkins
- In the Build section, select “execute windows batch command”.
- Now add the following commands:
cd <location of Automation folder>
pabot –processes 2 –outputdir Results FolderName/
- Finally, save the configuration and then click on “build now”. Jenkins’ build gets started.
Limitations
1. Need to import installed libraries in Pycharm for every project. The scope of imported libraries remains valid to that project.
2. For nested loops in Robot, we need to adopt complicated syntax.
Conclusion
After carrying out the steps mentioned above, you will be all set to do the GUI, API, and DB automation with Robot framework. Try this method and share your experiences with us in the comments section.


