Jenkins, as we know is an automation server that helps automate the process of build, test and deploy and implement CI/CD workflows needed for every software nowadays. It also helps QAs to either integrate smoke/sanity automation test script after the build flow itself or to run regression suites separately by creating and scheduling Jenkins job.
Considering we all are familiar with the basics of Jenkins, in this blog we talk about one of the Jenkins project type ‘Jenkins pipeline’ and some features and configurations related to it:
- What is Jenkins Pipeline?
- Why Jenkins Pipeline?
- Jenkins Pipeline Implementation
- Jenkins pipeline with master-slave build execution
- Blue ocean Jenkins UI
- Summary
What is Jenkins Pipeline?
Pipelines are Jenkins jobs enabled by the Pipeline plugin and built with simple text scripts that use a Pipeline DSL (domain-specific language) based on the Groovy programming language. Jenkins pipeline allows us to write Jenkins build steps in code (Refer Figure 1)
This is a better alternative for the generally used freestyle project where every step of CI/CD is configured step by step in the Jenkins UI itself
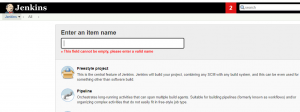
Figure 1: Jenkins Project type ‘Pipeline’
Why Jenkins Pipeline?
The traditional approach of maintaining jobs has some limitations like:
- Managing a huge number of jobs and their maintenance is tough
- Making changes to Jenkins jobs through UI is very time consuming
- Auditing and tracking the jobs is tough
Thus Jenkins pipeline provides a solution to it as it automates the job steps in the simple groovy script and the pipeline file itself becomes the part of our codebase in SCM. This helps in the following:
- Automating the job since build steps are written in the form of code in a simple Jenkins text file.
- Jenkins file can be a part of our Sourcecode and can be checked into a version control system
- Better audit logging and tracking of changes in the job is possible
- Deploying a similar job in any other environment is easy since we don’t need to install plugins and setup individual job steps again
- Visualization of the execution status of each stage of the job is good
Jenkins pipeline implementation
To write a Jenkins pipeline file using groovy script for our Jenkins job we need to understand some of these terms.
A Jenkins file can be written using two types of syntax – Declarative and Scripted. Since Declarative is more recent and is designed to make writing and reading Pipeline code easier, we’ll take its example (Refer Figure 2)
- Pipeline -A Pipeline’s code defines your entire build process, which typically includes stages for building an application, testing it and then delivering it.
- Agent/Node– Defines the Jenkins worker where we want this job to run. If left blank it’s treated as ‘any node’
- Stage –Stage structures your script into a high-level sequence and defines a building stage like build, deploy, test etc. User can define stages as he wants based on how he wants to divide the job conceptually
- Step-A single task. Fundamentally, a step tells Jenkins what to do at a particular point in time
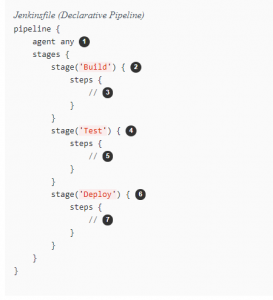
Figure 2: Basic Building Blocks Declarative Pipeline (numbering in the image shows execution sequence)
Let’s take the example of Postman collection execution through Newman Command as we did in our project and also explained in one of previous blog series ‘API automation using postman –Simplified’
To execute postman API tests using Jenkins and store test results, we are required to pull postman collection from git, install some dependencies like npm, run Newman command for executing the collection, process the output to fetch important data and commit the report to git
This all can be done in a freestyle project by step by step configuring each stage and some steps require some plugin installation first.
But if we want to achieve the same thing using Jenkins pipeline, we just need to write a simple text file by using the syntax shown in Figure2. Thus every required set of actions can be added in the different stages of Jenkins file as shown in Figure 3.Steps can include commands similar to windows batch commands, Linux shell script etc. with groovy syntax. When this pipeline job executes, there are visualization plugins to see the execution details for each stage like which stage caused any failure or how much time it took to complete a stage, etc. (Refer Figure 4)
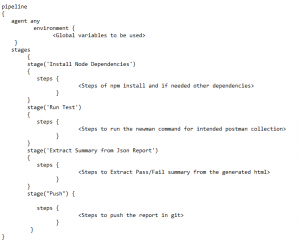
Figure 3: Pipeline text file template for one example case of Newman execution of postman collection
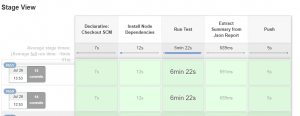
Figure 4: Pipeline Stage view after execution
Jenkins pipeline with master-slave build execution
If we use distributed execution of Jenkins and have Slave nodes or agents for running Jenkins job and we want to run Jenkins pipeline on a specific agent, Agent name can be specified as
agent {label ‘my-defined-label’ } rather than specifying Agent as ‘any’ in the declarative pipeline
To understand the flow of Jenkins Slave execution better, let’s briefly go through how to create a slave node in master and create a connection with the slave node
In your master Jenkins go to Manage Jenkins->Manage Nodes where master node already exists
Click on the new node and configure the details (Refer Figure 5)
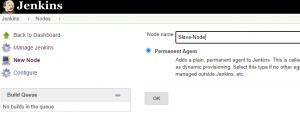
Figure 5: Add a Node
There are now 2 ways to establish a connection
- Master Node connects to slave node over SSH
For this method of establishing a connection between master and slave, we need to configure slave agent’s host IP port and private ssh key in the Slave configuration modal (Refer Figure 6). Private ssh key of the agent needs to be added under Jenkins credentials manager using Add Credential option and then it can be selected from the Credentials field dropdown.
Also point to note here is that the user has to save this ssh key as allowed host to verify it as a known host, if we are using the host key verification strategy as ‘Known hosts file Verification Strategy’ as shown in the image.
Then the master is able to connect to the slave agent


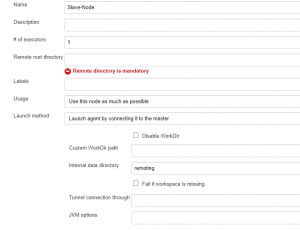
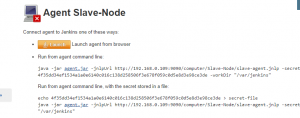
Figure 6: Slave Node Configuration using a method where Master connects to Slave (SSH method)
- Slave Node connects to Master node Also called a connection through JNLP (useful when a slave is behind firewall)
Setting up the slave node using this method requires to do some Jenkins settings first
- Under Manage Jenkins->Configure Global Security, Specify TCP port for Agents (Refer Figure 7)

Figure 7: Setting TCP port
- Under Manage Jenkins->Configure System, Specify Jenkins location to which Agents can connect (Refer Figure 8)
By default, the location is set to localhost which needs to be modified to Jenkins server’s local IP and TCP port

Figure 8: Setting Jenkins Location
After the above settings are done, go to Manage Jenkins->Manage Nodes and create New Node (similar to Image)
In the Slave node configuration (Refer Figure 9), under Launch method, we can see the option ‘Launch agent by connecting it to master’ (in older versions also referred as Launch agent via JAVA web start)

Figure 9: Slave Node Configuration using a method where Slave connects to master (JNLP method)
After providing ‘Remote root directory’, click on save and click on create slave-Node
For windows, it provides a direct option to Launch agent. In the slave, the machine hit the Jenkins server URL and click on Launch option
While for Linux, Command is provided to be run (Refer Figure 10)

Figure 10: Launch options after Slave node creation
Using the above methods one can set up the slave nodes and execute Jenkins jobs. User can also make use of docker to run Jenkins container in achieving the same
Blue Ocean UI
Blue Ocean is a new frontend for Jenkins and is built from ground up for Jenkins pipeline. This new modern visual design aims to improve clarity, reduce clutter, and navigational depth to make the user experience very concise.
To enable Blue Ocean UI, the user first needs to install the Blue Ocean plugin. (Refer to Figure 11)

Figure 11: Launch options after Slave node creation
Once the Plugin is installed, the user can see the option ‘Open Blue Ocean’ in the left pane to switch to Blue Ocean UI (Refer Figure 12). Similarly while in Blue Ocean UI, the user sees the option to switch to classic UI (Refer Figure 13)
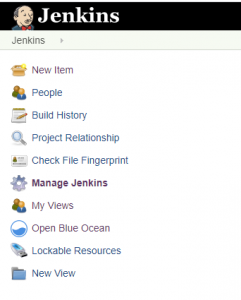
Figure 12: Launch options after Slave node creation
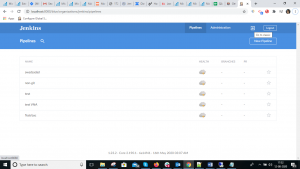
Figure 13: Launch options after Slave node creation
Blue Ocean UI provides:
- Sophisticated visualization of the pipeline
- A pipeline editor
- Personalization
- More precision to quickly find what’s wrong during an intervention
- Native integration to branch and pull requests
The below images give a high-level idea of how the New Pipeline creation view looks like (Refer Figure 14) and how pipeline execution is visualized (Refer Figure 15) in the blue ocean.
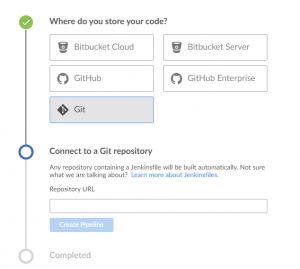
Figure 14: New Pipeline Creation in Blue Ocean
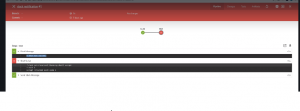
Figure 15: Pipeline Execution Visualization in Blue Ocean
Pipelines are visualized on the screen along with the steps and logs to allow simplified comprehension of the continuous delivery pipeline – from the simple to the most sophisticated scenarios. Scrolling through 10,000 line log files is not required now as Blue Ocean breaks down log per step and calls out where your build failed.
Conclusion
Pipelines, although having few limitations in terms of plugin compatibility and additional effort needed for managing and maintaining pipeline scripts in cases of applications and technology changes, still has multiple benefits to conclude that Pipelines are a fantastic way to view traditional jobs, and it gives us new view backed by years of traditional CI power. Blue Ocean builds upon the solid foundation of the Jenkins CI server by providing both a cosmetic and functional overhaul for the modern process.


