Introduction
One of the best practices in iOS development is to be able to manage multiple environments during the development of a project. Many a time we might have to jump between DEV, QA, STAGE, and Production environments. As the owner of a product, clients request to have both development version of the app and production version of the app i.e. App store released version of the app on the same device.
If you have ever faced or might face this situation, then you need a custom build scheme.
Objective
This blog explains the significance of custom build schemes & build configurations in XCode. We will see how we can leverage these to configure an iOS project to support multiple build environments without the need to duplicate targets and keep the same code base.
Prerequisites
- XCode 8.0 onwards
- Mac machine with macOS Sierra version
Advantages of Custom Builds
- Write code that only runs on a particular environment. For example, on DEV you might want to have different values to constants in the app than on Production.
- Switch between different environments easily to deliver a build that talks to the production server after testing your app in a development environment.
Difference Between Build Schemes & Build Configurations
Before we start actual changes on XCode, let’s understand the difference between build schemes & build configurations first.
A build scheme is a blueprint for an entire build process. It is a way of telling Xcode what build configurations you want to use to create the development, unit test, and production builds for a given target (framework or app bundle).
A build configuration is a specific group of builds settings that can be applied to any target.
Most app projects come with two build configurations and one build scheme. You get the debug and release build configurations along with a building scheme that runs the debug configuration for debugging purposes and the release configuration for archiving/submission.
For most projects, this is perfectly fine and requires no tweaking. However, if you want to offer both a DEV and a PRODUCTION version of the same app, it’s not quite enough. You must add a new build configuration to achieve this.
Adding a new build configuration
Whenever you wish to support multiple environments in the app, you need to start by adding a new build configuration. There are some important steps involved which sometimes seems confusing at first, so follow every step carefully.
- Open Xcode and select the project file.

2. Go to Editor → Add Configuration → Duplicate Debug Configuration.

Repeat Steps 1 and 2 for Release configuration.
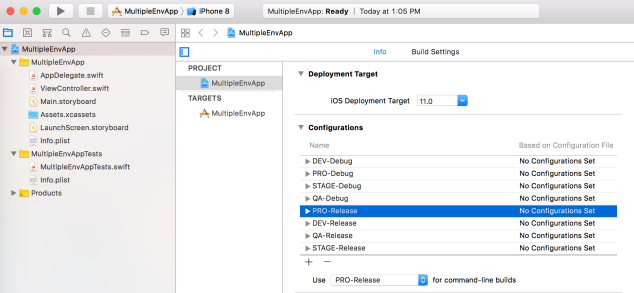
NOTE: Remember that for every environment you must Duplicate Debug and Release configuration. Thus, if you want to support DEV, QA, STAGE, PRO then you should have the following configuration:
- DEV-Debug, DEV-Release
- QA-Debug, QA-Release
- STAGE-Debug, STAGE-Release
- PRO-Debug, PRO-Release
Creating a separate build scheme for every environment
We’re going to take our new build configurations and create a build scheme that runs them.
- Tap on the currently active scheme.
- In the dropdown, select New Scheme.
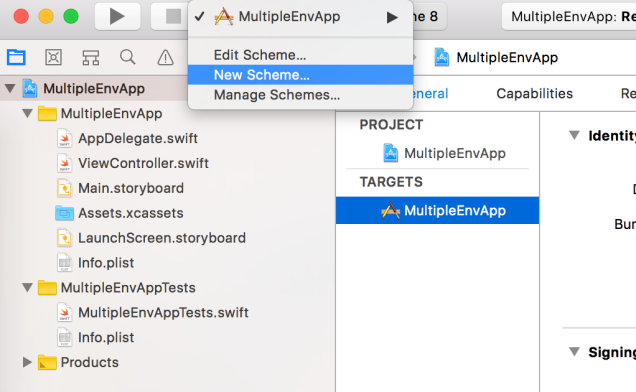
3. Provide a name to the new build scheme. I usually follow <Name of the app>- <Environment>. For example, MultipleEnvApp-QA.

Once you’ve done this, notice that your new build scheme is selected.

We’re not done yet. We have a build scheme, but it isn’t using our new build configurations yet.
4. Click on your build scheme and select Edit Scheme.

5. Select the appropriate build configuration as per the environment. For example, our selected scheme is MultipleEnvApp-QA, hence choose respective QA build configurations.

That’s it. In the same way, you can create and configure schemes for STAGE and PRO environment. You can rename the default scheme as MultipleEnvApp-DEV
Writing code that runs on a particular environment of your app
Unfortunately, having separate build schemes isn’t quite enough. We also need a way to selectively run blocks of code on a particular environment. To do that, we are going to add a custom Swift flag that only applies to the particular build configurations we just created.
- Select the target and then Go to Build Settings, and scroll down to Other Swift Flags.
- You must add the flags for every configuration. For example, add the flag “-DQA” to both of the QA build configurations.

-D is the namespace for custom flags that can be passed into a build command.
You can ignore the “-D” for now.
3. Go to any of your source files. For example, AppDelegate and add these lines of code.
https://gist.github.com/vkhemnar/7b4c38bb8f8597f2ac4792208dab3f2c
We have created a global variable SOME_SERVICE_KEY and used a unique value for each environment. In this way, you can actually use different service keys, constants for different environments.
Different bundle identifiers for different build configurations
Optionally, if you want to use different bundle ID for different configurations, do the following:
- Create two app IDs on your Apple Developer portal.
- Go to your project settings and set the appropriate bundle identifiers for different build configurations.

Conclusion
That’s all there is to it. Now you are setup to deliver a configurable app for different environments using the same shared codebase. Here is the GitHub project that contains all the configurations which we followed in this blog.
You May Interested In: Why is swift faster
Happy Coding!

