Automated testing has multiple benefits. They reduce costs, accelerate development and delivery, ensure high quality of performance, increase productivity and more to help organizations fulfil the market demands. That is why testing automation is a top priority for leading software companies. Organizations are all up for test automation tools that are easy to set up, easy to learn, fast, and generate accurate results.
I have worked with a couple of test automation tools, and I found that Cypress satisfies most of the current market needs. You can quickly start test automation with Cypress, and it is easy to learn. In this article, I am sharing some insights on Cypress to understand better.
Why Cypress and not Selenium?
Below are some of the critical factors that you can check in Cypress.
- Automatic waiting
Cypress: Has an excellent automatic wait mechanism. The automatic wait saves a lot of time for the automation tester to maintain and write the code for wait logic.
Selenium: No automatic wait. You have to deal with implicit/explicit/fluent delays.
- Time travel
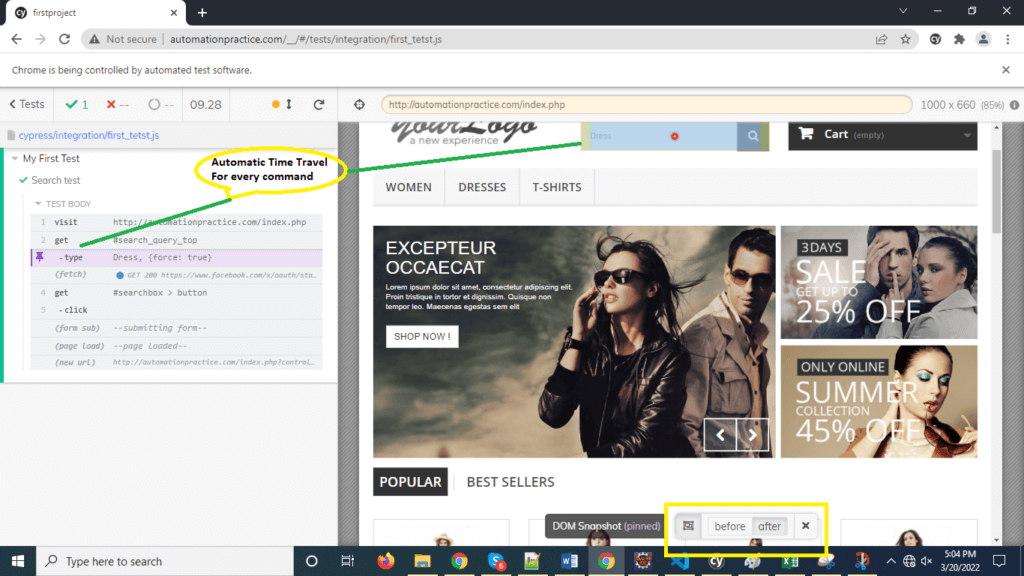
Cypress: Automatically takes a screenshot and records the test execution. Just hover over the commands given in the Command Log to check each step precisely.

Selenium: No automatic time travel.

- Speed
Cypress: Very Fast (in browser test execution, it makes execution 5-6 times faster than Selenium).
Selenium: Selenium test execution requires web driver interface to communicate with browser, thus the test execution is slow.
Test executed on Selenium took 40 seconds

Same test executed on Cypress took 9.28 seconds

- Test Flakiness
Cypress: Tests are less flaky as test execution happens in a real time (synchronous) and in browser. Cypress has the tendency to automatically wait for the element to exist in the DOM.
Selenium: Tests are flaky as compared to Cypress.
Limitations of Cypress
Though Cypress is quick & easy to learn, it has some limitations as well as given below.
- Supports only Java script to write an automation test.
- Does not support multi tab tests.
- Limited support for iframe.
- Does now allow mobile automation.
In a nutshell, one could use Cypress where you need fast pace web automation with less learning and want to avoid a headache for the framework setup.
Check out the steps mentioned below for the quick start of Cypress.
Setting up Cypress
- Download and install Node JS from the link below:
https://nodejs.org/en/download/ - Install npm globally by running the below command in cmd (run cmd in administrator mode):
npm install -g npm - Create a folder where you want to start with Cypress.
- Open the folder in cmd and execute the command below.
npm init
It will ask you to provide project name and further details (you can provide project name like TestAutomationProject).
npm install cypress –save-dev - For cypress installation please run the command below in cmd.
Run Cypress:
- Go to your project folder and run the below command.
npx cypress open
After a moment, the Cypress Test Runner will launch.
- From Cypress Test Runner you can run different sample tests and view the results.
Write your first test:
You need an editor to write tests and to maintain a framework. To do so, first download visual studio code editor:
- Download and install visual studio code editor from the link mentioned below based on your operating system:
https://code.visualstudio.com/download
- Open visual studio code editor.
- Click on file >> open folder

- Select your project folder
- Under Cypress/integration folder create a test file with name first_test.js.

- Now you can write the test code in this file and save it.

- Go to Terminal >> New Terminal, it should open terminal in bottom.

- In the terminal, enter the command.
npx cypress open
After a moment, the Cypress Test Runner will launch and it will show your newly created test as well.

- Click on your test, it will run the test

And, it is completed.
Now, moving onto to the next. Let’s try a real world automation use case with framework setup. In this example, I will use a testing website (http://automationpractice.com/index.php) and I will then automate sign in functionality.
Step 1- Under Cypress, create a folder with the name of page-objects. In this folder, you will create page classes for the application web pages. For better naming and framework maintenance, make sure class name should be same as page/model name.

Step 2- Under the page-object folder create a class with name signinpage.js to maintain sign-in page related UI elements and methods to deal with those elements.

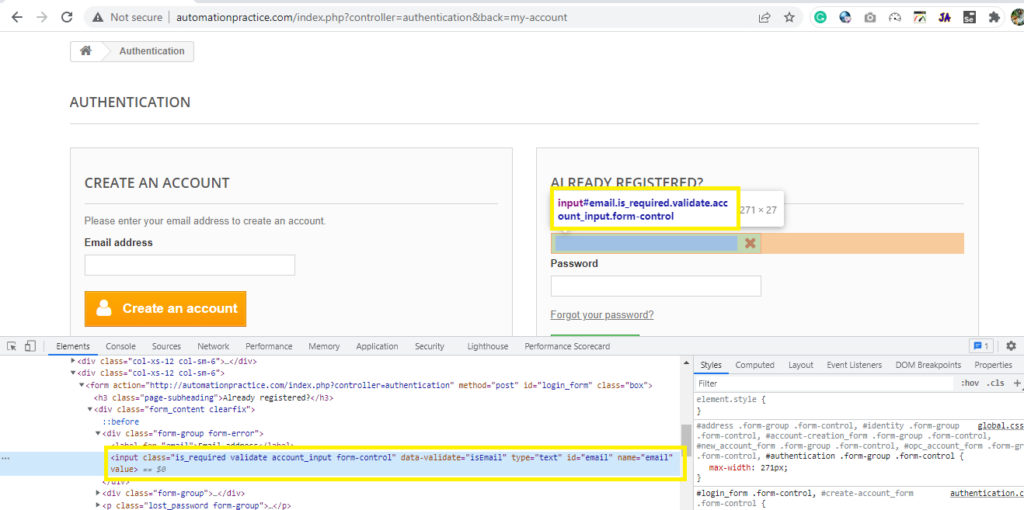
Step 3- Now, let’s identify UI elements of sign in page and put all those elements path in signinpage.js class. Inspect sign page elements and copy their CSS selector paths. Put those details in signinpage.js file.

Use the code in the signinpage.js file:
/// <reference types=”cypress” />
class SigninPage {
constructor() {
this.signInOption = ‘#header > div.nav > div > div > nav > div.header_user_info > a’
this.signInEmail = ‘#email’
this.signInPassword = ‘#passwd’
this.signInButton = ‘#SubmitLogin > span > i’
this.homePageLink = ‘a[title=”Home”]’
}
//visiting the url
visit(value) {
cy.visit(value)
}
clickOnSignInOption() {
cy.get(this.signInOption, { timeout: 10000 }).click();
}
enterEmail(value) {
cy.get(this.signInEmail, { timeout: 10000 }).clear();
cy.get(this.signInEmail).type(value, { force: true })
}
enterPasssword(value) {
cy.get(this.signInPassword, { timeout: 10000 }).clear();
cy.get(this.signInPassword).type(value, { force: true })
}
clickOnSignInButton() {
cy.get(this.signInButton).click();
}
//method to verify login successful or not
verifyHomepageLink(){
cy.get(this.homePageLink, { timeout: 10000 }).should(‘be.visible’)
}
}
export default SigninPage
Step 4- Next, write a login test under integrations folder in first_test.js file or you can create a new testfile:
import SigninPage from ‘../page-objects/SigninPage’
const signinPage = new SigninPage();
describe(‘Sign in page Test’, () => {
it(‘Login test’, () => {
signinPage.visit(“http://automationpractice.com/index.php”);
signinPage.clickOnSignInOption();
signinPage.enterEmail(‘automationusertest@yahoo.com‘);
signinPage.enterPasssword(‘test123’);
signinPage.clickOnSignInButton();
signinPage.verifyHomepageLink();
})
})
Step 5 – Its done, execute the test, in the terminal enter the command.
npx cypress open
After a moment, the Cypress Test Runner will launch and it will show your newly created test as well. Click on your test, it will run the test.
Final Words
After carrying out all the steps mentioned above, share your experience of automating tests with Cypress. If there is anything that you think I missed, mention it in the comments section. I hope this quick guide will help you in the future to automate your tests quickly and reduce your workload with its effectiveness.
Read More


