1. INTRODUCTION
Let suppose one of our clients want us to monitor its infrastructure of more than 60 servers. Basically a centralized syslog server should do the work, but to analyze so much data, syslog wasn’t sufficient. Instead we installed OSSec.
1.1 What is HIDS
A host-based intrusion detection system (HIDS) is a system that monitors a computer system on which it is installed to detect an intrusion and/or misuse, and responds by logging the activity and notifying the designated authority. A HIDS can be thought of as an agent that monitors and analyzes whether anything or anyone, whether internal or external, has circumvented the system’s security policy.
1.2 What is OSSec
* Open Source Host-based IDS (HIDS) * http://www.ossec.net
Key Features :
* Log analysis
* File Integrity checking (Unix and Windows)
* Registry Integrity checking (Windows)
* Host-based anomaly detection (for Unix – rootkit detection)
* Active response
* Alerting
OSSEC is an Open Source Host-based Intrusion Detection System. It performs log analysis, integrity checking, Windows registry monitoring, Unix-based rootkit detection, real-time alerting and active response.
OSSec is mainly useful for 3 things:
* see what is going on;
* stop brute-force attacks (ftp, web, ssh…);
* cover PCI-compliance requirements related to monitoring.
1.3 Why OSSEC?
* Open-Source
* log analysis
* Easy to install
* Easy to customize (rules and config in xml format)
* Scalable (client/server architecture)
* Multi-platform (Windows, Solaris, Linux, *BSD, etc)
* Secure by default (need to create the certificate / private key for SSL )
* Ossec comes with many decoders/rules which analyis our logs:
telnetd, Su, Sudo, vsftpd, Postfix, Apache, syslog etc
2. Architecture
OSSEC utilizes a client/server architecture.It has a central manager for monitoring and receiving information from agents.
2.1 Manager (or Server)
The manager is the central piece of the OSSEC deployment. It stores the file integrity checking databases, the logs, events, and system auditing entries. All the rules, decoders, and major configuration options are stored centrally in the manager; making it easy to administer even a large number of agents.
2.2 Agents
The agent is a small program, or collection of programs, installed on the systems to be monitored. The agent will collect information and forward it to the manager for analysis and correlation. Note:
The rules only exist on the manager. All analysis is done on the manager. Agents do not send alerts to the manager, they only send the raw logs.
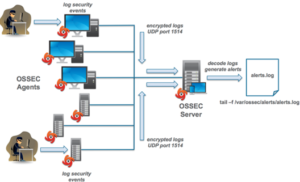
2.3 Ossec Flow Digram :
Agent forward the logs to manager using port 1514 and server analysis those logs and store in alerts.log file .
3. OSSec Client/Server Setup
3.1 Ossec Server Installtion:
Firstly, Install necessary package required
- sudo apt-get install gcc make git
- sudo apt-get install libssl-dev
After this clone our Github repository and compile the source code, to install OSSEC:
- cd ~
- mkdir ossec_tmp && cd ossec_tmp
- git clone -b stable https://github.com/wazuh/ossec-wazuh.git
- cd ossec-wazuh
- sudo ./install.sh
Choose server when being asked about the installation type and answer the rest of questions as desired. Once installed, you can start your OSSEC manager running:
sudo /var/ossec/bin/ossec-control start
Check the service : ps aux |grep ossec
3.2 Ossec client Installation
Follow the same process as above but Choose agent when being asked about the installation type and answer the rest of questions as desired.
After Setting up agent we need to Connect it with OSSEC-Server .
Automatically creating and setting up the agent keys
The complain more often about OSSEC is related to how hard it is to setup the authentication keys between the agents and the manager. Each agent share a key-pair with the manager, so if you have a thousand agents, you need a thousand keys.
To make life easier, OSSEC added a new daemon on the manager, called ossec-authd.
- it is a daemon you run on the server when you deploy your agent;
- it will populate your agents key;
- when you have finished to deploy, you stop it.
*note that you only need to run this command on the manager (not on the agents)
- openssl genrsa -out /var/ossec/etc/sslmanager.key 2048
- openssl req -new -x509 -key /var/ossec/etc/sslmanager.key -out /var/ossec/etc/sslmanager.cert -days 365
Once the keys are created, you can start the ossec-authd:
- /var/ossec/bin/ossec-authd -p 1515 >/dev/null 2>&1 &
Setting up the agents
On the agents, the work is minimal. All you have to do is to run the following command:
- /var/ossec/bin/agent-auth -m <ServerIP> -p 1515 -A <agent-name>
That’s it. The keys are now exchanged and you can start your agent.
sudo /var/ossec/bin/ossec-control start
4. Ossec Directory Structure and Processes
First, a look at the /var/ossec directory. It is composed of several subdir; most important sub-directories for the moment are: etc, logs and rules.
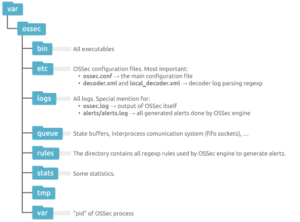
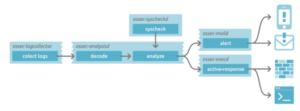
What we are interested for now is in etc/ossec.conf, it is the central configuration file used by all executable, that will act on this work-flow
4.1 Central configuration file
The etc/ossec.conf has 6 sections:
- global (global);
- rules (rules);
- syscheck (syscheck/rootcheck);
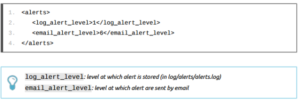
- alerts (alert);
- active-response (command/active-response);
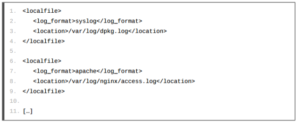
- collector (localfile).
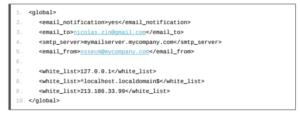
4.1.1 Global Section
4.1.2 Collector Section
4.1.3 Syscheck

4.1.4 Rules
You don’t need to touch to that (yet), it just specify rules files to load. Normally, when you will

need to write your own rules, you will edit the “local_rules.xml”.
4.1.5 Alerts
4.2 OSSec Internal Process:
Each daemon has a very limited task:
- Analysisd – Does all the analysis (main process)
- Remoted – Receives remote logs from agents
- Logcollector – Reads log files (syslog, Flat files, Windows event log, IIS, etc)
- Agentd – Forwards logs to the server
- Maild – Sends e-mail alerts
- Execd – Executes the active responses
- Monitord – Monitors agent status, compresses and signs log files, etc
ossec-control manages the start and stop of all of them
5. Integration With ELK
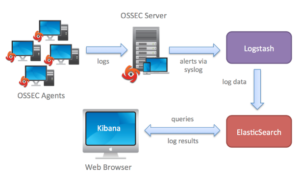
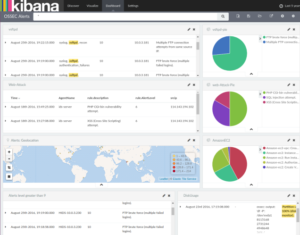
Integration of our OSSec with ELK Stack, for long term data storage, alerts indexing, management and visualization.
Components( OSSec ,Logstash,Elasticserach and kibana) are meant to communicate with each other, so the original data generated by systems and applications is centralized, analyzed, indexed, stored and made available for you at the Kibana interface. See below a graph describing this data flow:
ELK set up may be on the same machine where we have ossec server running Or we can use Distributed Deployments:
5.1 Graphical User Interface
5.1.1 Ossec UI
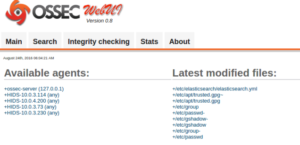
Follow following link to install Ossec Web UI
http://www.ossec.net/wiki/index.php/OSSECWUI:Install
we can see Ossec UI using following URL:
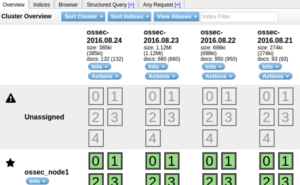
5.1.2 Elasticsearch UI
Follow following link to install ELK
http://wazuh-documentation.readthedocs.io/en/latest/ossec_elk.html
To access Elasticsearch UI use following Url:
http://<IP>:9200/_plugin/head/
5.1.3 Kibana UI
To access Kiaban UI use following URL:
6. Troubleshooting
6.1 Check Ossec services running status:
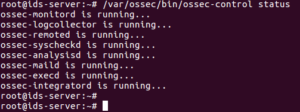
6.2 Check running services of ossec:

If ossec services is not running or user make any changes to ‘/var/ossec/etc/ossec.conf’ always restart OSSEC using command:
/var/ossec/bin/ossec-control restart
6.3 Removing an agent
If you want to remove an OSSEC agent from the server, use the ‘R’ option in the manage_agents sart screen. You will be given a list of all agents already added to the server. To remove an agent, simply type in the ID of the agent, press enter, and finally confirm the deletion. It is important to note that you have to enter all digits of the ID.

7. References:
http://wazuh-documentation.readthedocs.io/en/latest/
http://www.ossec.net/wiki/index.php/OSSECWUI:Install
https://github.com/wazuh/ossec-wazuh
http://ossec.github.io/


