Introduction :
We can use “Mobile vision API” to find objects in photos and videos. Currently it supports face detector, barcode reader and text detectors.
In this tutorial, we will learn the basics of face detection concept and how we can implement face detector on Android Applications.
Basic Concepts :
- Face Detection : Face detection is the concept of locating faces in photos or videos automatically.
- Face Recognition : To determine if two faces are of the same person.
- Face Tracking : Face Detection on Videos i.e. to track a face of a person in consecutive video frames. Note that Face Tracking is not a form of Face Recognition.
- Face Orientation : Before going in details about “face orientation”, let’s get familiar with “Euler Angles”.
What are Euler Angles ?
“The Euler Angles are three angles introduced by Leonhard Euler to describe the orientation of a rigid body with respect to a fixed coordinate system“(source : wiki).
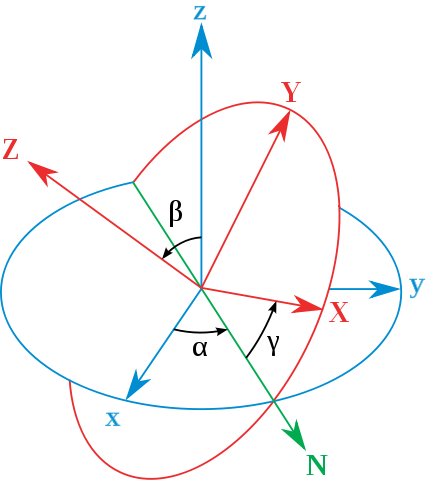
Take a look into the below image :
(source : wiki )
x,y,z : Axis of the original frame
X,Y,Z : Axis of the rotated frame
N : ( Known as the line of nodes ) is the intersection of the plans xy and XY.
Now, the three Euler angles can be defined as below :
- α : angle between x and N axis (known as x-convention. Also it can be defined between y and N , called y-convention)
- β : angle between z and Z axis.
- γ : angle between N and X axis. (x-convention)
The face API uses Euler Y and Euler Z for detecting faces. Euler Z is reported always. Y is available only if “accurate” mode is used in the face detector. Another mode is “fast” mode which uses some shortcuts for the detection.
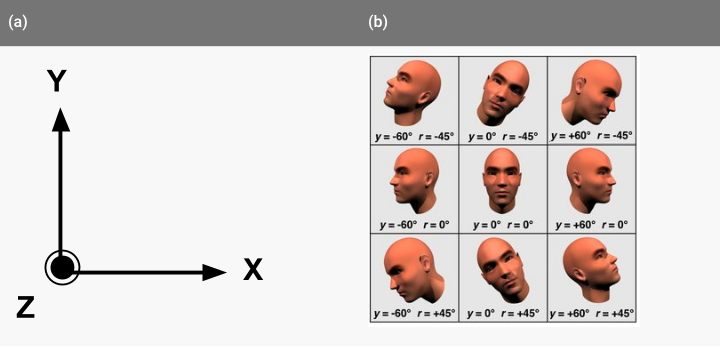
(z axis is coming out of the XY plan)
(image source 1 and 2)
LandMark :
Landmark is a point of interest within a face. e.g. eye, nose base .
Following are the detectable landmarks with this api :
| Euler Y angle | detectable landmarks |
|---|---|
| < -36 degrees | left eye, left mouth, left ear, nose base, left cheek |
| -36 degrees to -12 degrees | left mouth, nose base, bottom mouth, right eye, left eye, left cheek, left ear tip |
| -12 degrees to 12 degrees | right eye, left eye, nose base, left cheek, right cheek, left mouth, right mouth, bottom mouth |
| 12 degrees to 36 degrees | right mouth, nose base, bottom mouth, left eye, right eye, right cheek, right ear tip |
| > 36 degrees | right eye, right mouth, right ear, nose base, right cheek |
Classification:
Using classification, the face api detects a certain facial characteristic. Currently ‘eyes open ‘ and ‘smiling’ classifications are supported in android.
Let’s build an App :
We will develop one simple app using face api . This project is also shared on Github .
1. Create one Activity with a layout as below :
<?xml version="1.0" encoding="utf-8"?>
<RelativeLayout xmlns:android="http://schemas.android.com/apk/res/android"
    xmlns:tools="http://schemas.android.com/tools"
    android:id="@+id/activity_main"
    android:layout_width="match_parent"
    android:layout_height="match_parent"
    android:paddingBottom="@dimen/activity_vertical_margin"
    android:paddingLeft="@dimen/activity_horizontal_margin"
    android:paddingRight="@dimen/activity_horizontal_margin"
    android:paddingTop="@dimen/activity_vertical_margin"
    tools:context="com.talentica.facedetectionsample.activity.MainActivity">

    <com.talentica.facedetectionsample.view.FaceDetectorView
        android:id="@+id/view_facedetector"
        android:layout_width="match_parent"
        android:layout_height="match_parent" />
</RelativeLayout>
2. Create one custom View.
setData method will be used to set one bitmap image and list of faces detected on the image. Whenever onDraw method is called and if the faces inside the images are detected , it will call drawBitmapToDeviceSize method first to draw the provided bitmap . Finally drawFaceDetectionBox will be called to draw one box on each of the detected faces.
public class FaceDetectorView extends View {

    private Bitmap mBitmap;
    private SparseArray mFaces;

    public FaceDetectorView(Context context, AttributeSet attrs) {
        super(context,attrs);
    }

    public void setData(Bitmap bitmap, SparseArray faces) {
        mBitmap = bitmap;
        mFaces = faces;
        invalidate();
    }

    @Override
    protected void onDraw(Canvas canvas) {
        super.onDraw(canvas);

        if (mBitmap != null && mFaces != null) {
            double deviceScale = drawBitmapToDeviceSize(canvas);
            drawFaceDetectionBox(canvas, deviceScale);
        }
    }

    private double drawBitmapToDeviceSize(Canvas canvas) {
        double viewWidth = canvas.getWidth();
        double viewHeight = canvas.getHeight();
        double imageWidth = mBitmap.getWidth();
        double imageHeight = mBitmap.getHeight();
        double scale = Math.min(viewWidth / imageWidth, viewHeight / imageHeight);

        Rect bitmapBounds = new Rect(0, 0, (int) (imageWidth * scale), (int) (imageHeight * scale));
        canvas.drawBitmap(mBitmap, null, bitmapBounds, null);
        return scale;
    }

    private void drawFaceDetectionBox(Canvas canvas, double deviceScale) {
        Paint paint = new Paint();
        paint.setColor(Color.YELLOW);
        paint.setStyle(Paint.Style.STROKE);
        paint.setStrokeWidth(3);

        for (int i = 0; i < mFaces.size(); ++i) {
            Face face = mFaces.valueAt(i);
            float x1 = (float) (face.getPosition().x * deviceScale);
            float y1 = (float) (face.getPosition().y * deviceScale);
            float x2 = (float) (x1 + face.getWidth() * deviceScale);
            float y2 = (float) (y1 + face.getHeight() * deviceScale);

            canvas.drawRect(x1, y1, x2, y2,
                    paint);
        }
    }
}
3. MainActivity will first detect all faces using FaceDetector and set the faces and bitmap to our above custom view.
Note that if face detection is used for the first time on a device, PlayService will first download some additional libraries. Hence detector.isOperational() check is there to make sure that it will work without any problem.
public class MainActivity extends AppCompatActivity {
    private SparseArray mFaces;
    private FaceDetectorView mDetectorView;
    @Override
    protected void onCreate(Bundle savedInstanceState) {
        super.onCreate(savedInstanceState);
        setContentView(R.layout.activity_main);

        mDetectorView = (FaceDetectorView)findViewById(R.id.view_facedetector);

        Bitmap bitmap = BitmapFactory.decodeStream(getResources().openRawResource(R.raw.family));

        FaceDetector detector = new FaceDetector.Builder(this)
                .setTrackingEnabled(false)
                .setLandmarkType(FaceDetector.ALL_LANDMARKS)
                .setMode(FaceDetector.FAST_MODE)
                .build();

        if (!detector.isOperational()) {

        } else {
            Frame frame = new Frame.Builder().setBitmap(bitmap).build();
            mFaces = detector.detect(frame);
            mDetectorView.setData(bitmap,mFaces);
            detector.release();
        }

    }
}
4. That’s it , the result will look as below : 
Try to run this project by yourself . If the image is not appearing , make sure that internet is active and you have at-least 10% free device space. ( as mentioned before, first time it requires to download some external libs ) .
Reference :
1. wiki
– Nandan
nandan.dutta@talentica.com


