I have developed a series of blogs on containerizing .NET Applications using Docker. This blog is the first of the three-part series; we will first look at the Docker support. NET. Then, we will check the tools available to dockerize .NET applications, and finally, we will build a sample .NET application with multiple components interacting with each other.
Moving onto the second part, I will take you through running the sample .NET application on Docker. We will also look at the changes that should be made in the application for containerization. Then, in the last part, we will explore Docker compose, a tool to define and share multi-container applications like our sample application. So, let us get started.
Before I start, I would like to mention that I will not discuss what Docker is and why there is a need to containerize the applications. You can check out some resources to get started on Docker.
Docker Support in .NET
With WSL (Windows Subsystem for Linux), windows allow you to run Docker Linux containers natively without emulation. WSL2 is a full Linux kernel built by Microsoft and with Docker running on WSL2 on Windows, users can avoid maintaining separate build scripts for Linux and Windows. Since .NET Core is cross-platform, we do not need to worry about writing different code for different platforms. We usually have uniform development experience with Docker whether we are developing .NET applications on Windows or Linux. Just create images that target Linux OS and check that they run smoothly on Windows as well as on Linux hosts.
Tools to Dockerize .NET Applications
Visual Studio, as well as Visual Studio Code, are two IDEs that provide full support for developing and debugging .NET applications on Docker. Users can also develop and publish applications using .NET CLI. In this article, we will primarily use Visual Studio to develop our application. .NET CLI command will also be provided wherever necessary.
Building The Application
We are going to build upon the sample WeatherForecast API template project that Visual Studio provides and add different components to it. Here are different components in our application
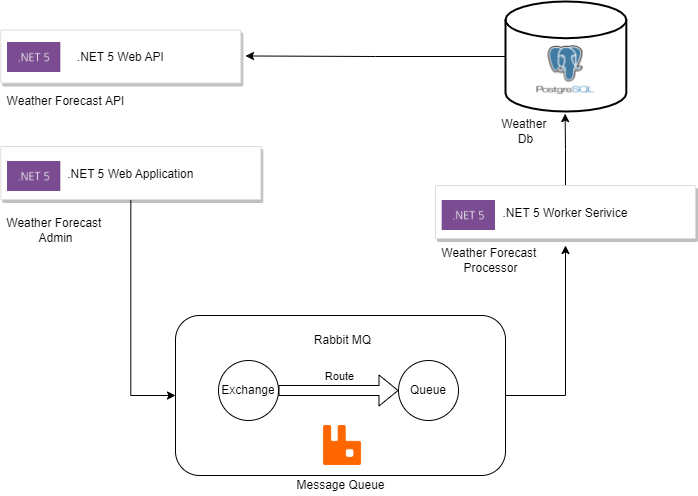
- WeatherForecastApi: This is a web API project containing a single GET endpoint that will list all the weather forecast information. This information will come from a PostgreSQL database(WeatherDb).
- WeatherForecastAdmin: This is a web application for the admin user to enter the weather forecast information for a particular date. This information will be published to a message queue (RabbitMQ)
- WeatherForecastProcessor: This is a worker process application that consumes the weather forecast messages received on the message queue (RabbitMQ) and writes that information to the database(WeatherDb)
So firstly, we will be developing this application locally without any docker support and then we will check if it is easy to add docker support.
Weather Forecast API
- Create a new project in Visual Studio using the template ASP.NET Core Web API. The same can be done using the dotnet command-line tool.
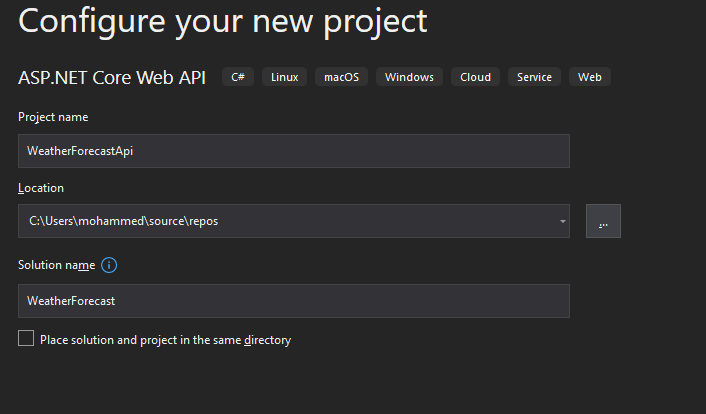
dotnet new webapi -n WeatherForecastApi — framework “net5.0”
If we run the application, it will open in Swagger UI, and we will see that there is just one GET endpoint that returns a list of 5 randomly generated weather forecasts information.
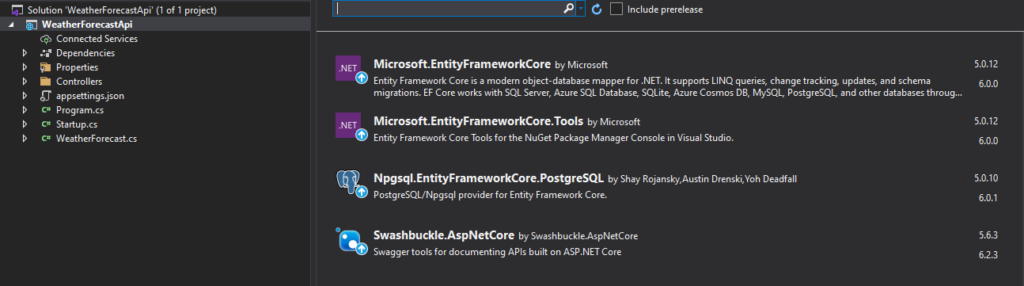
We are now going to get this information from a PostgreSQL database and for that we are going to use Entity Framework Core. Let us add the following dependencies to our project
- Microsoft.EntityFrameworkCore
- Npgsql.EntityFrameworkCore.PostgreSQL: This is the provider library of PostGreSQL for EntityFrameworkCore
- Microsoft.EntityFrameworkCore.Tools: This will be needed to add migration support
Add package from Visual Studio
dotnet add package Microsoft.EntityFrameworkCore -v “5.0.12″
dotnet add package Npgsql.EntityFrameworkCore.PostgreSQL -v “5.0.10”
dotnet add package Microsoft.EntityFrameworkCore.Tools -v “5.0.12”
Now, let us make the following changes to let our application connect to the database:
- Add an Id field in the WeatherForecast model so that we can uniquely identify it in the database.
- Create a WeatherDbContext class that inherits from EFCore DbContext.
- Add a DbSet of WeatherForecast public field to WeatherDbContext. This will hold the information of the WeatherForecast table from our WeatherDb.
- Override the OnModelCreating method in WeatherDbContext class to add some seed data.
- In Startup.cs file, inject the WeatherDbContext in the ConfigureServices method and configure it to use with the PostgreSQL database.
- Add a connection string named WeatherDatabase in appsettings.json file which is being used in WeatherDbContext class.
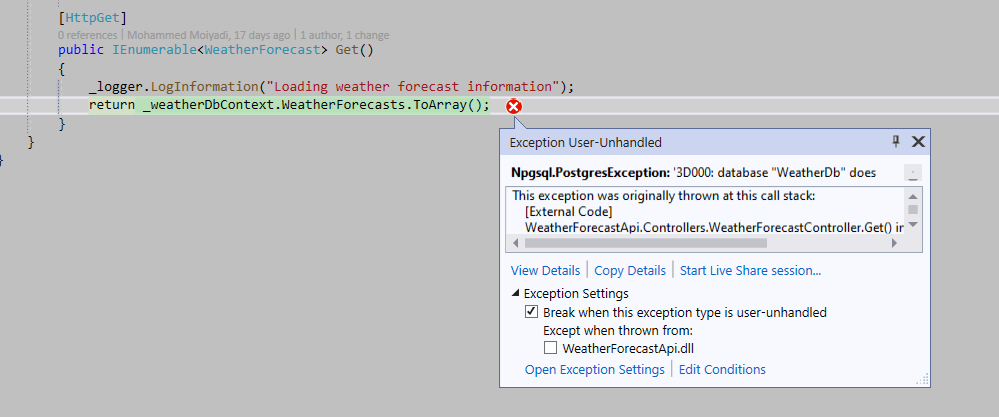
Now, that we have configured the database, let us change the WeatherForecastController to return the data from the database.
- Inject WeatherDbContext in the constructor and set it as a field.
- Replace the Get method to return WeatherForecasts array from WeatherDbContext
WeatherForecastController.cs
Make sure to add logging in the code whenever necessary, since this will help us to track what is going on in our application and debug issues if any. Also, Visual Studio will let us see logs of each application separately when we run it on docker.
If we now run the application and call the Get API, we are going to get the error WeatherDb database does not exist.
So, now let us create the database and add a migration to add some seed data to the database:
- Create the database using pgAdmin to connect to the remote or local server and create a database named WeatherDb
- Add an initial migration to create the WeatherForecasts table and add seed data. You can either do that from Visual Studion Package Manager Console by running the following command.
Add-Migration InitialMigration
or you can run dotnet ef command line. You first need to have dotnet-ef installed on your system:
dotnet tool install — global dotnet-ef
dotnet ef migrations add InitialMigration
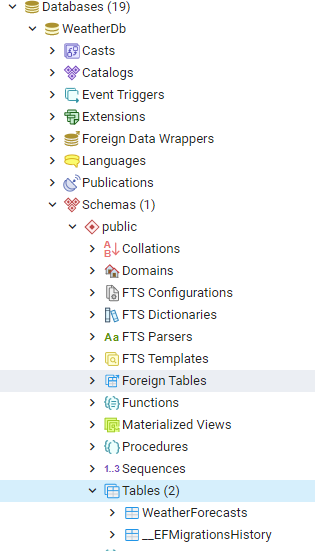
As soon as you run any of the above commands, you will see there is a Migrations folder added to our project and it has a migration class added that contains the code to create the WeatherForecasts table and add seed data to the table. EF Core automatically figures this out by comparing the database schema with the models defined in the DbContext class and generating the necessary code to add the missing models in the database.
Initial Migration generated by ef migrations
Now, we just need to run this migration on our database. This can be again done from Package Manager Console by running the following command
Update-Database
or you can run the dotnet ef command below
dotnet ef database update
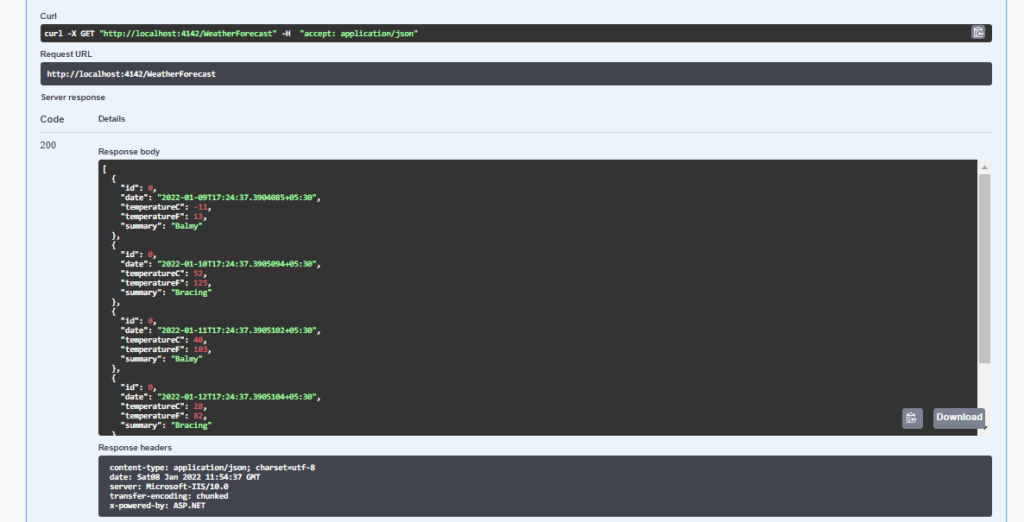
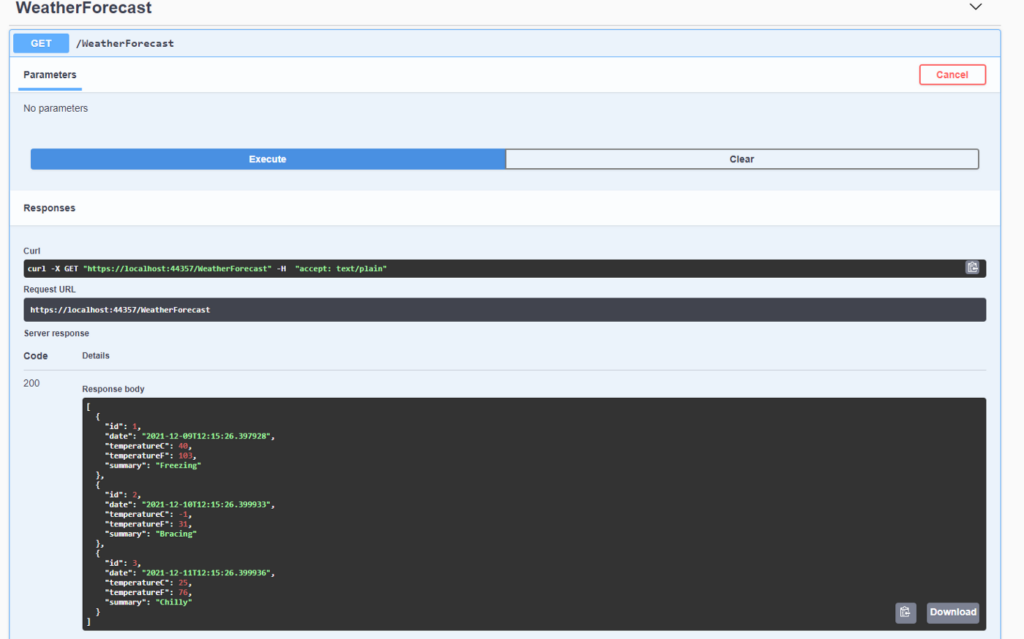
And now if we check the database tables, there are now two tables created namely WeatherForecasts that contains the seed data for weather forecast information, and __EFMigrationsHistory to keep track of migrations. If we now run the application and call the Get API, we see it correctly returns the data from the database.
Now if we run the application, we will be able to see the seed data from the database in the API call
And with that, we have now completed the development of our Web API project. Now, let us move to the weather forecast admin web application
Weather Forecast Admin
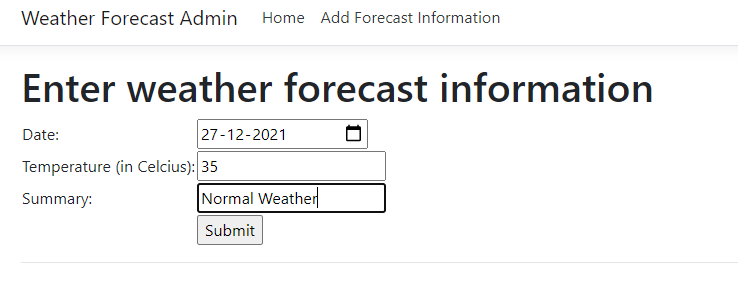
This will be a Web Application with a user interface wherein an administrator can log in and enter the weather forecast information for a given day and that information will then be sent to a message queue. We are not going to have any authentication to keep the application simple.
Before we proceed, let us save the Web API project to a solution file so that we can add more projects to it. Select the solution in Visual Studio and save the solution to the root folder of the API project. Name the solution file appropriately.
Add a new project to our solution from Visual Studio using the template “ASP.NET Core Web App”
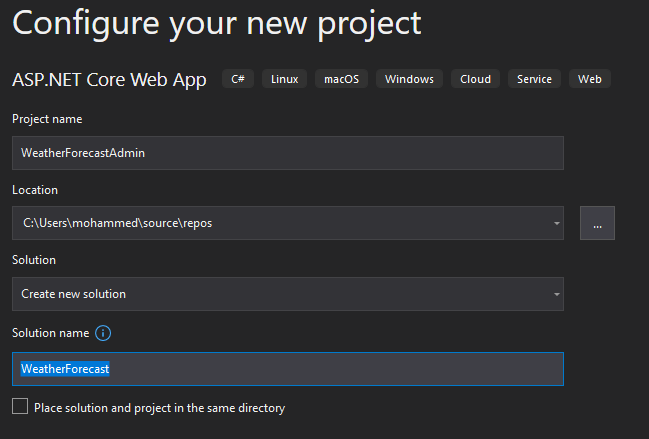
dotnet new webapp -n “WeatherForecastAdmin” — framework “net5.0”
dotnet sln add .\WeatherForecastAdmin
Since this web application is going to talk to RabbitMQ, let us check the following package
- RabbitMQ.Client
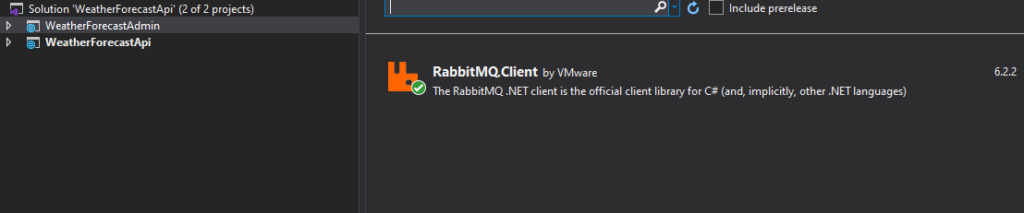
dotnet add package RabbitMQ.Client -v “6.2.2”
If we run the web application, we will see the default page in the browser with the Home and Privacy section. Get rid of the Privacy section and replace it with an Add Forecast Information section.
- Change the _Layout.cshtml file to remove the Privacy list item and add a new list item to navigate to WeatherForecast asp-page with the section name as Add Forecast Information.
- Remove the Privacy.cshtml and Privacy.cshtml.cs file.
- Add a new Razor page with the name WeatherForecast.cshtml to the pages folder from Visual Studio. It will automatically add WeatherForecast.cshtml.cs file with an OnGet method inside it.
dotnet new page WeatherForecast
- Replace the content of WeatherForecast.cshtml.cs as below:
Let us now see the changes:
- We have added public fields for Date, TemperatureInCelcius, and Summary data to be received from the form.
- We have injected an interface IWeatherForecastAddNotification through the constructor and assigned it to a private field.
- We have added an OnPost method which will be called on form submit and will populate the public fields through model binding. We are then calling the notification interface’s WeatherForecastAdded with the weather forecast data which it will then send to the message queue.
Let us now implement the form which will be displayed to the user for entering weather forecast data. Replace the content of WeatherForecast.cshtml as below:
This is a quite simple form with label and input fields for the three fields that the user is going to enter and a button to submit the form. Please note the name attribute values of the fields should match with the fields that we have defined in the .cshtml.cs file for model binding to work.
Now, let us implement the IWeatherForecastAddNotification interface
Create a folder called Integrations to the project and add the below files
IWeatherForecastAddNotification.cs
WeatherForecastAddNotification.cs
So, our interface contains just one method to be implemented i.e., WeatherForecastAdded which takes the three-form field values and populates a new model called WeatherForecastReceivedMessage with it. Rest of the code in the method deals with serializing the message model and publishing it to the queue through a channel that we have created in the constructor using the RabbitMQ.Client nuget. The details of this implementation can be found at Rabbit MQ Dotnet Tutorial. Also, note that we are getting the hostname for Rabbit MQ from the configuration. So, let us now add it to the appsettings.json file:
appsettings.json
Note that we are using localhost as our Rabbit MQ host which means we are running a local Rabbit MQ server. The details to install and setup can be found on RabbitMQ Website
Now, just inject the IWeatherForecastAddNotification and its implementation from the ConfigureServices method in Startup.cs.
ConfigureServices in Startup.cs
Now, if we run the application to submit the form after entering some data, we can see that the entered data is correctly sent to the queue.


Let us now implement the other end of this queue namely the WeatherForecast Processor.
Weather Forecast Processor
This will be a Worker Service application that consumes the messages from the message queue and writes the received weather forecast information to WeatherDb.
Add a new project to our solution from Visual Studio using the template Worker Service
dotnet new worker -n “WeatherForecastProcessor” — framework “net5.0”
dotnet sln add.\WeatherForecastAdmin
A class named Worker has been created already, which inherits from the BackgroundService abstract class and implements the ExecuteAsync method. This is where we are going to write the logic to consume the messages from the message queue. Let us first add the following packages to our project
- RabbitMQ.Client

dotnet add package RabbitMQ.Client -v “6.2.2”
Let us modify the content of Worker.cs to below
Let us understand what is happening here
- In the constructor, we are injecting IWeatherForecastRepository which will write the Weather Forecast data to WeatherDb
- Also, we are initializing the Rabbit MQ connection and registering an event handler ProcessWeatherForecastReceived to the consumer.
- In the message handler, we first deserialize the message to the same model from which it was serialized while sending. So, we have defined the WeatherForecastReceivedMessage model in a separate Models folder. Then we just call the repository method to save the data to the database.
- In the ExecuteAsync method, just call the BasicConsume method which will trigger the event handler as soon as a message arrives on the queue.
For the implementation of WeatherForecastRepository, we are going to use Dapper with PostgreSQL provider for .NET. For this, we will need to add the following packages to our project
- Dapper
- Npgsql
- System.Data.SqlClient
The same can be done from the dotnet command line
dotnet add package Dapper -v “2.0.123”
dotnet add package Npgsql -v “6.0.0”
dotnet add package System.Data.SqlClient -v “4.8.3”
Let us now create a Repositories folder with the following interface and implementation.
IWeatherForecastRepository.cs
WeatherForecastRepository.cs
In the implementation above, we are just opening the database connection and inserting the data using raw SQL query using ExecuteAsync of Npgsql connection. Read the connection string from config and then update appsettings.json with the required values.
The last thing to do is to inject the IWeatherForecastRepository and its implementation from the ConfigureServices method in Program.cs
Program.cs
Note that for the Worker Service application there is no Startup.cs file and the configuration happen through the CreateHostBuilder method only.
With that, we are now done with the development of our entire application. Let us run all the three applications together. If we first call the Get API of the weather forecast, we can only see the seed data that we entered through the initial migration
If we now go to the weather forecast admin application and enter weather forecast data for some date, it should be successfully published to the queue. With the worker process also running, the data should be consumed immediately from the queue.
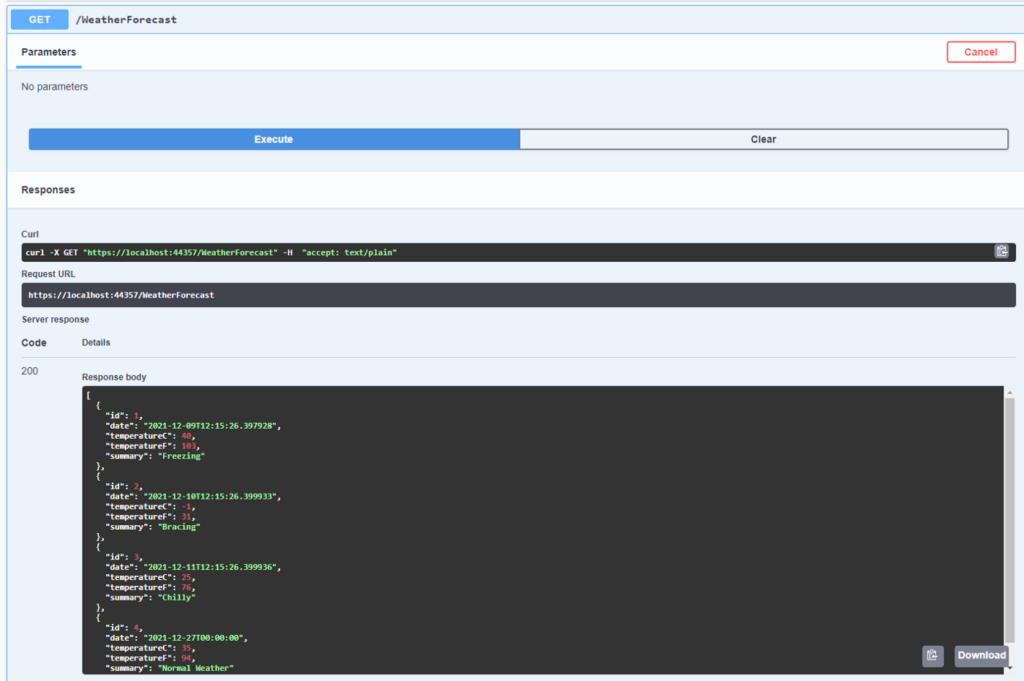
And, as we can see the new data that we entered from the admin app and from the Get API.
You May Also Interested In: Common Myth Regarding ViewState in ASP.NET
Conclusion
After successfully carrying out the process, share your experience with us in the comments section. In the next part of this blog series, I will take you through containerizing the application using Docker. Till then, happy coding!