Introduction
Javascript is a well known language for building powerful web applications. Programmers can leverage its huge potential with frameworks built on top of javascript libraries. Frameworks empower us to follow a good, consistent design pattern and provide ease of development with pre-built libraries for commonly used operations. Some such popular frameworks are Angularjs, Backbone.js, React.js, which are being used aggressively for building complex web application. This blog post describes steps to build another such javascript framework from scratch.
I guess you might be curious at this point of time – when we already have so many versatile frameworks available, why do we need to build our own framework in the first place? Well the answer is – custom utilities! Often there is a situation where you need to use native javascript or a library like jquery to attain your objectives and you don’t want to use those substantial web frameworks (disk space of angular.js framework approximately 1 mb – uncompressed version) that will increase the load time of your web pages. In certain situations, you can use your knowledge of design patterns to write manageable code.
So folks, let me introduce to you my own micro framework – Class.js!! It is a framework that can be used to manage your view (DOM element). This lightweight micro framework provides minimal design to manage the view layer of your application and will be useful where you have to create both static and dynamic content in your DOM.
Basic functionality which Class.js offer:-
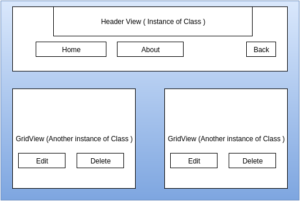
- Each nested view within your DOM is an instance of Class.
- Dynamic event binding which leverages the use of MutationObserver to watch DOM element
- You can write your HTML template on separate file and can use it whenever the view is initialized.
- You can use templating framework (Handlebars, Underscore) with Class.js
- You can define event handler as a method of the Class
- Ease of defining event listener with simple, effortless format
Defining your Class.js
 App.services.MainService = Class({

      tagname : 'div',

      events : {"#edit|^|click" : "onClickEdit", "#delete|^|click" : "onClickDelete" },

      className : 'row',

      attributes : { style : “width:100px;”},

      init : function (dataset) {

      // Constructor method will be called when we create instance of MainService

var self = this;    App.instances.httpService.LoadTemplate('/public/scripts/templates/grid.html',

          function (result) {

            self.tpl = result;

        });

      },

      onClickEdit : function () { // User defined method  },

      onClickDelete : function (id) { // Event handler },

     render : function () {

$(this.Element.html(this.tpl) );

return this;

      }

  });
Explanation of properties used in Class:
Tagna me : It defines the kind of element you want to create. Referring to the above code, we have created a div element. You can create li, p, a etc.
Element: A predefined class property where you will append your dynamic html content. A mutation observer is being designated on the Element property. Whenever an html string gets inserted to this property, it will search for those html selector (id, class, tagname etc) defined above within the html content and attach an event to that element.
Events: Define dom events in your Class. The format for defining a key is event_selector – seperator – event_name and the value will be the event handler (in our case it is onClickEdit & onClickDelete event handler attached to selector #edit and #delete respectively)
className : The class name assigned to the Class element.
Attributes : The list of attributes that you want to assigned to create the element. Here, the key will be an attribute name and value will be the attribute value.
Init: A constructor method that will invoke when an instance of Class will be created. You can write some logic that will execute whenever init method gets called.
Others : onClickEdit, onClickDelete are event handlers for those respective events.
Inside our init method we have loaded the view template, and saved the template to tpl attribute.
Usage
var mainView = new App.services.MainService();
$(".container").html(mainView.render().Element);
I have described the basic overview of my own micro framework which solve the purpose of managing the view. The code will be available on github, you can download and go through the code for an detailed explanation.
https://github.com/sandyz1000/Classjs/tree/master
Building of Class.js
Let’s move towards building our framework Class.js. As you can observe a Class framework is fundamentally a method Class which accepts object as a arguments with a set of property and method.
Let’s begin on how we have designed our Class framework. The below method is the central part of Class library.
window.Class = function (Object) {

      var jsClass = function() {

        var self = this;

        if(!this.Element) {

          this.Element = document.createElement('div');

        }

 this.init.apply(this, arguments);
      };

      for(var prop in Object) {

        if(Object.hasOwnProperty(prop)) {

          jsClass.prototype[prop] = Object[prop];

        }

      }

      if(!jsClass.prototype.init)

        jsClass.prototype.init = function(){ };

      return jsClass;

    };
The above code describes the basic workflow of Class method, it returns a jsClass function which will get invoked whenever we instantiate Class using new keyword. If you are already familiar with prototypal inheritance in javascript this might look familiar to you. We are simply iterating each property which is part of an object that is passed as an argument to Class and adding to jsClass prototype property. Those method will be available when you create an instance of Class.
I have added a sample project using our Class framework, there are additional library which might be required if you are building a single page application.
Some of the additional library are
History.js: If you wanted to build a single page application and you want a well defined url, histroy.js is there to rescue. The api is similar to History api with support for older browser.
Go through the link to get more information on history js
https://github.com/browserstate/history.js/
MutationObserver: For working with older browser especially Safari and IE MutationObserver api is not available on those browser. I have came across a library that provides the feasibility to work with MutationObserver, if it is not found as a part of native library.
Go through the link to get more info on MutationObserver.js
https://github.com/megawac/MutationObserver.js/tree/master
If you wanted to know more about MutationObserver go through MDN documentation
https://developer.mozilla.org/en/docs/Web/API/MutationObserver
EventEmitter.js: This is a helper library which will provide you the liberty to register a custom listener to listen for an event. You can emit an event from anywhere within your code and the listener will get invoked once an event occurred.
Go through the demo application to get more info on EventEmitter library.
We have already come to the end of this blog, you can refer this tutorial for learning purpose. You always have the liberty to select any framework of your choice, but knowing how to write manageable code using better design pattern is the purpose of this article.