Introduction
One of the best things about Android is custom ROMs. A custom Android ROM refers to a phone’s firmware, based on Google’s Android platform. The term ROM, which stands for Read Only Memory, really has very little to do with what a custom Android ROM actually is, can be confusing. Since Android is an open source mobile operating system that means anyone can download the source code, make modification to it, recompile it and release it for a wide variety of devices. Anyone can install ROMs to their device and achieve a modified appearance and behavior.
ROMs are developed by the Android community, often times by a group of core developers who do this purely out of passion for modding. This means that most are completely free. Custom ROMs are available for phones, tablets, media players, smart watches and almost any type of device running Android. Some of the distributors who provide custom ROMs can be found here.
Android Open Source Project (AOSP)
Android is an open source software stack for a wide range of mobile devices and a corresponding open source project led by Google (https://android.googlesource.com/). This Android Open Source Project repository offer the information and source code you need to create custom variants of the Android stack, port devices and accessories to the Android platform, and ensure your devices meet compatibility requirements.
Objective
Our main aim in this article is to check-out the source code of the Android OS, do a little customization to it (probably a UI tweak) and then build the source code which exports a system image file as an end product. Lastly, install the image file on a device and we are using Nexus 5X here. Since its drivers are easily available on Google Developers site. Also I ran into some issues and I will mentioning their solutions here so that it helps someone who is trying to achieve the same.
Prerequisites
According to Google it is a must to have a Linux or Mac machine since building AOSP using Windows is not currently supported.
The hardware requirements are:
- A 64-bit environment is required for Gingerbread and above versions.
- At least 100GB of free space for downloading the source code and another 150GB to build it. This requirement is in-case when you are building master branch of AOSP which is in-sync with the current development of Android. But if you are building against a device tag which is suitable for a particular device type and OS version then the space requirements are less.
- If you are running a Linux VM then you need at least 16GB of RAM/swap.
The Software requirements:
- The recommended operating system versions are Ubuntu 14.04(Trusty) and Mac OS v10.10 or later. Also in case of OSX you need to have Xcode command line Tools v4.5.2 or later.
- Python 2.6 to 2.7 (python.org) : Repo is wrapper over Git and it is used to checkout the large code-base of Android OS. Since Repo is built on particular functionality from Python v2.x thats why we need python.
- GNU Make 3.81 to 3.82 (gnu.org): It is a tool which controls the generation of executables and other non-source files of a program from the program’s source files. Android’s build system is “make” based and requires a recent version of GNU Make. It is by default available in the Xcode.
- Git 1.7 or newer (git-scm.com): Most of the times we will be using Repo. Repo allows us to use Git in an easier way. But in the end we need Git to perform certain operations as a source control.
- We are building a tag (android-8.1.0_r18) for Nexus 5x so we downloaded the corresponding drivers for the same from here.
- Lastly we need to download Java development kit (JDK). In case you are building Android 7.0 (Nougat) – Android 8.0 (Oreo) then we need jdk jdk 8u45 or newer.
Setting up build environment
We are using MacOS High Sierra v10.13.4 for this process and we choose build number OPM5.171019.017. Now moving forward we will discuss about the Mac environment setup and its pitfalls. Mac OS runs on a case-preserving but case-insensitive filesystem for e.g. you cannot have two files with names demo.txt and DEMO.txt but this type of filesystem is not supported by git and will cause some git commands (such as git status) to behave abnormally. So it is recommended to create a case-sensitive disk image.
To create a case-sensitive disk image go to Disk Utility.app>>File>>New Image>>Blank Image. Enter the details as shown in figure below.

We selected a size of 180 GB since we will be doing the checkout and the building process in this disk partition. We used the default home directory as the place for the disk image file and note that this file can act as external drive. To mount it just double-click the file. The reason behind using spaseimage is that you can increase the partition size with a simple command (if you find more space is required in checkout process):
| hdiutil resize -size <new-size-you-want>g ~/android.dmg.sparseimage |
Next step is to install Xcode command line tools and for that you need to need first install the Xcode and then the Command line tools. To install Xcode make an apple developers account from here. After successfully creating the account go to the App Store app in your Mac and login using that account. Now in the App Store you can install Xcode:
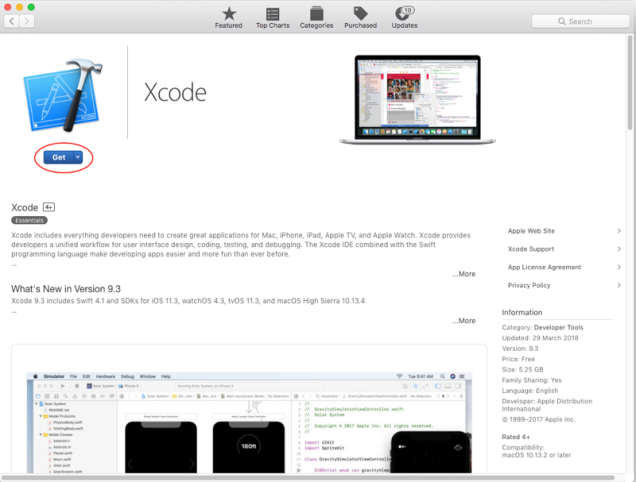
Once Xcode is installed go to the terminal and install the command line utils using the command:
| xcode-select –install |
The reason behind installing the Xcode command line tools is that it comes with a default GNU make bundle which is used build our source code.

Next we need to install macports from here. Macports is a tool for installing applications and command line tools on your Mac. It has a huge library of “ports”(the Macports term for something that can be installed). Once Macports is installed you can find it in the path: /opt/local/bin and you need to add this path to you bash profile.
Note: To know more about bash profile refer this link.
The below command install packages which are used to compile AOSP and these are the dependencies required by make and git.
| POSIXLY_CORRECT=1 sudo port install gmake libsdl git gnupg |
That’s all for setting up the build environment.
Downloading the Source from AOSP
The Android source tree is located in a Git repository hosted by Google and to access it we used a tool named Repo as discussed earlier. To install Repo make a directory with name “bin” in your home directory of Mac where you created the sparseimage and then include this path in your bash profile. This can be done via commands:
| mkdir ~/bin | |
| PATH=~/bin:$PATH |
Next download the Repo tool using curl and then make it executable using chmod command. curl is a tool to transfer data from or to a server, using one of the supported protocols. chmod refers to change mode, command used to change the permissions of files or directories and with ‘a+x’ command we are allowing executing permission to everyone for that directory:
| curl https://storage.googleapis.com/git-repo-downloads/repo > ~/bin/repo | |
| chmod a+x ~/bin/repo |
Now Repo is ready to use. Next proceed to the disk partition we created earlier and configure your git credentials first with commands:
| git config –global user.name “Your Name” | |
| git config –global user.email “you@example.com” |
Its time to initialize our repository with our selected build number for Nexus 5X:
| repo init -u https://android.googlesource.com/platform/manifest -b android-8.1.0_r18 |
To start downloading the source code use this command:
| repo sync |
This is the terminal output of syncing in-progress:

Now at this point we faced an error with sync:
error: RPC failed; curl 56 OpenSSL SSL_read: SSL_ERROR_SYSCALL, errno 60
fatal: The remote end hung up unexpectedly
Error code 56 indicates a curl receive error which means there was some issue that prevented the data from being received during the sync process. Typically this is caused by a network setting, firewall, VPN client, or anti-virus that is terminating the connection before all data has been transferred. I disabled my anti-virus and it didn’t occur next time.
It took me around 12 hours to completely sync the source code and again it depends on the connection speed you are using. When download is complete the terminal will show a success message as below:

and the files/folders will be structured like this:

Building the Android Source tree
Before starting the build process there two things we need to take care of:
- Install the binaries or drivers which are required by the hardware of our Nexus 5X. We downloaded two files with names extract-lge-bullhead.sh and extract-qcom-bullhead.sh. These are device drivers from LG and bullhead is codename for Nexus 5X. To install them move both files to the root of checked-out folder of our repo and execute the following command in the Terminal:
| ./extract-lge-bullhead.sh | |
| ./extract-qcom-bullhead.sh |
This command will create a vendor/ folder in the root directory and place driver files from in it.
2. Now let’s do a little customization of our own which will reflect in the custom ROM. We thought why not add something to the settings menu of the Android OS. We can add a device info which resembles the custom rom. So move to the following folder: /packages/apps/Settings/res/xml/ and open the file which goes by the name: device_info_settings.xml . Go to the bottom the XML file and add the following code which is below the comment ‘Customized setting:‘:
| <!– Detailed build version –> | |
| <Preference | |
| android:key=”build_number” | |
| android:title=”@string/build_number” | |
| <!–Customized setting: Custom ROM name –> | |
| <Preference android:key=”rom_name” | |
| android:enabled=”false” | |
| android:shouldDisableView=”false” | |
| android:title=”ROM name” | |
| android:summary=”My customn ROM”/> |
Now lets start the building process by initializing our build environment with the following command:
| source build/envsetup.sh |
The above command will not print any output on terminal when its successful but in-case of error it will print an error message. Now we are going to use lunch which is a distributed process launcher and with lunch, one can launch software processes on wide variety of systems. Lastly it makes sure they keep running. It restarts the software that crash and provides a mechanism to manage dependencies between running processes. The command is very simple:
| lunch |
After executing this command you will see to the following output:
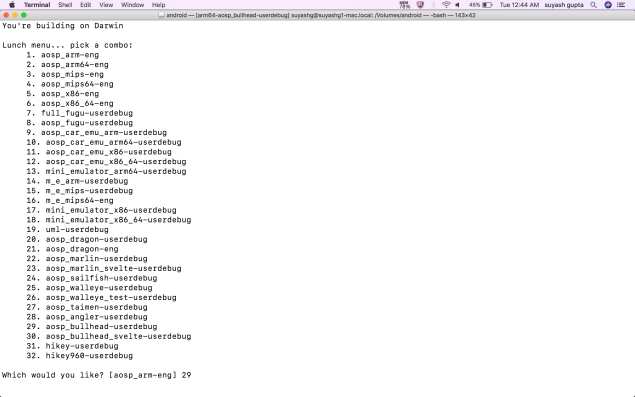
Since we are using Nexus 5x whose codename is bullhead that’s why we need to select option number 29 here. Now the final command to start the building process is:
| make -j4 |
As explained earlier we are using GNU Make for building and “-j4” argument specifies the number of jobs to run simultaneously. Now make looks for Makefile, which is in the directory where the command is executed and it contains information about compilation of the project. Then it compiles the whole package according to that information. You will see the following output in the terminal:

The building process requires an ample amount of the time, in this case it was around 10-12 hours. Once it has completed you will see a success message in terminal and the system file will be generated inside “output/target/product/bullhead/system.img”.

Running the System image file to Nexus 5X:
Now connect your Nexus 5x via USB and check by executing command ‘adb devices’ whether it is showing in the devices list. If it showing then move to next step else in ‘settings>>Developer Options’enable the ‘USB debugging’ and it will show up right away.
Note that before moving forward I need to remind you to back-up all the data currently stored in your device like contacts, photos etc. Since we are performing a hard reset here. Next we execute the below command:
| make fastboot adb |
Fastboot is a special diagnostic and engineering protocol that you can boot your Android device into. While in fastboot, you can modify the file system images from a computer over a USB connection. Not all phones have a fastboot mode that the user can access. It’s turned on with Nexus devices by default. Once set up, you boot your phone to fastboot and you can flash image files to your phone’s internal memory. The fastboot mode looks like this:

You can see in the above image there is a term named bootloader. The bootloader is a program that starts whenever a device is powered on and it activates the operating system. You can flash a custom system only if the bootloader allows it, and the bootloader is locked by default.
Now to unlock bootloader go to the devices settings make sure the ‘Developer Options’ are enabled, you need to enable ‘USB debugging’ and enable OEM unlocking. OEM stands for Original equipment manufacturer. Some manufacturers don’t let you install any custom rom or mess with your recovery or bootloader unless you unlock the OEM ,which simply means getting rid of all rights reserved by the manufacturer.
Lastly use fasboot command to unlock th bootloader:
| fastboot flashing loc |
If re-locking the bootloader:
| fastboot flashing unlock |
Since the bootloader is unlocked we can move ahead with the flashing. Put the device in the fastboot mode by using the command:
| adb reboot bootloader |
and finally run:
| fastboot flashall -w |
Note: The -w option wipes the /data partition on the device.
After this command process of wiping the data will start and it will install the customised build image to the device. Now after the installation if we go to the settings and scroll down we will be able to see the following setting.

Conclusion
The modification which I have made is very basic one and there is a lot we can do like in the customisation step for e.g. make a pre-installed app, add ringtones, add wallpapers etc. Also you can create builds for Hikey, which are designed to help non-Nexus component vendors develop and port drivers to Android releases. To explore more in this particular domain you try reading books related to Embedded Android.
Let me know if you have any queries or doubts regarding the article in the comments section below, till then Happy Coding!

