Purpose
Infra/Devops team maintains a Golden Image (Base Image) which is a production ready base image with pre-installed required software like java,tomcat,nagios-client, default-system users. For security patch or software version update we have to keep updating the Base Image which requires manual AMI updation and creation process.
Solution
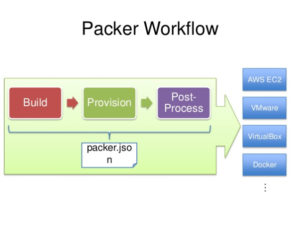
Packer is easy to use and automates the creation of any type of machine image.Out of the box Packer comes with support to build images for Amazon EC2, CloudStack, DigitalOcean, Docker, Google Compute Engine, Microsoft Azure, QEMU, VirtualBox, VMware, and more.

1. Packer Download and install
Download Packer Binary from hashicorp site on your Linux machine
wget https://releases.hashicorp.com/packer/0.12.1/packer_0.12.1_linux_amd64.zip

 Unzip the downloaded zip file
unzip packer_0.12.1_linux_amd64.zip
Copy the binary file in your local path
cp packer /usr/local/bin/
Export the path
export PATH=$PATH:/usr/local/bin/packer
Verifying the Installation
packer -v
2. Create a Basic Json template ( base_image.json) of packer
{
      "builders": [{
     "type": "amazon-ebs",
     "access_key": "",
     "secret_key": "",
     "region": "us-west-2",
     "source_ami": "ami-1e299d7e",
     "instance_type": "t2.micro",
     "ssh_username": "ec2-user",
     "ami_name": "Base_Image_1.0.0"
      }]
 }
access_key,secret_key
Provide access_key and secret_key either in template itself or set environment variables AWS_ACCESS_KEY_ID and AWS_SECRET_ACCESS_KEY else it looks for the credentials file (.aws/credentials) in the user’s home directory.
type
amazon-ebs Create EBS-backed AMIs by launching a source AMI and re-packaging it into a new AMI after provisioning.
region
Provide you region
source_ami
Provide source image ami id
instance_type
Provide the instance type of ami to be created
ssh_username
Provide default username (ec2-user for Amazon Linux AMI)
ami_name
Provide the name of new ami to be created
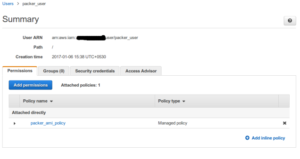
3. Create an IAM User named “packer_user” in AWS .
4. Create a custom inline Policy named “packer_ami_policy” as shown
{
      "Version": "2012-10-17",
      "Statement": [
     {
            "Effect": "Allow",
            "Action": [
                 "ec2:AttachVolume",
                 "ec2:AuthorizeSecurityGroupIngress",
                 "ec2:CopyImage",
                 "ec2:CreateImage",
                 "ec2:CreateKeypair",
                 "ec2:CreateSecurityGroup",
                 "ec2:CreateSnapshot",
                 "ec2:CreateTags",
                 "ec2:CreateVolume",
                 "ec2:DeleteKeypair",
                 "ec2:DeleteSecurityGroup",
                 "ec2:DeleteSnapshot",
                 "ec2:DeleteVolume",
                 "ec2:DeregisterImage",
                 "ec2:DescribeImageAttribute",
                 "ec2:DescribeImages",
                 "ec2:DescribeInstances",
                 "ec2:DescribeRegions",
                 "ec2:DescribeSecurityGroups",
                 "ec2:DescribeSnapshots",
                 "ec2:DescribeSubnets",
                 "ec2:DescribeTags",
                 "ec2:DescribeVolumes",
                 "ec2:DetachVolume",
                 "ec2:GetPasswordData",
                 "ec2:ModifyImageAttribute",
                 "ec2:ModifyInstanceAttribute",
                 "ec2:ModifySnapshotAttribute",
                 "ec2:RegisterImage",
                 "ec2:RunInstances",
                 "ec2:StopInstances",
                 "ec2:TerminateInstances"
            ],
            "Resource": "*"
     }
      ]
 }
5. Attach the created Policy “packer_ami_policy” to user “packer_user” as shown .

Validate the packer json file before running
root@adityad1:/home/adityad1/chef-hu/packer# packer validate base_image.json
Template validated successfully.
6. Build the packer to create your AMI
root@adityad1:/home/adityad1/chef-hu/packer# packer build base_image.json
 amazon-ebs output will be in this color.

 ==> amazon-ebs: Prevalidating AMI Name...
      amazon-ebs: Found Image ID: ami-1e299d7e
 ==> amazon-ebs: Creating temporary keypair: packer_586f6d61-50d3-87c7-79d4-47878630b37d
 ==> amazon-ebs: Creating temporary security group for this instance...
 ==> amazon-ebs: Authorizing access to port 22 the temporary security group...
 ==> amazon-ebs: Launching a source AWS instance...
      amazon-ebs: Instance ID: i-08ec69f82ca4d20f2
 ==> amazon-ebs: Waiting for instance (i-08ec69f82ca4d20f2) to become ready...
 ==> amazon-ebs: Waiting for SSH to become available...
 ==> amazon-ebs: Connected to SSH!
 ==> amazon-ebs: Stopping the source instance...
 ==> amazon-ebs: Waiting for the instance to stop...
 ==> amazon-ebs: Creating the AMI: Base_Image_1.0.0
      amazon-ebs: AMI: ami-d3c073b3
 ==> amazon-ebs: Waiting for AMI to become ready...
 ==> amazon-ebs: Terminating the source AWS instance...
 ==> amazon-ebs: Cleaning up any extra volumes...
 ==> amazon-ebs: No volumes to clean up, skipping
 ==> amazon-ebs: Deleting temporary security group...
 ==> amazon-ebs: Deleting temporary keypair...
 Build 'amazon-ebs' finished.

 ==> Builds finished. The artifacts of successful builds are:
 --> amazon-ebs: AMIs were created:

 us-west-2: ami-d3c073b3
Provision in Packer
For provisioning , I have used chef provision as shown inside packer to run my base_image cookbook recipe
{
      "builders": [{
     "type": "amazon-ebs",
     "access_key": "",
     "secret_key": "",
     "region": "us-west-2",
     "source_ami": "ami-1e299d7e",
     "instance_type": "t2.micro",
     "ssh_username": "ec2-user",
     "ami_name": "Base_Image_1.0.0"
      }],
      "provisioners": [{
     "type": "file",
     "source": "/home/adityad1/chef-hu/packer/packer_client.pem",
     "destination": "/tmp/packer_client.pem"
      }, {
     "type": "chef-client",
     "server_url": "https://api.chef.io/organizations/organization_name",
     "node_name": "packer_client",
     "install_command": "curl -L https://www.chef.io/chef/install.sh | {{if.Sudo}}sudo{{end}} bash -s -- -v 12.15.19",
     "run_list": ["base_node::base_image"],
     "validation_key_path": "/home/adityad1/chef-hu/.chef/client-validator.pem",
     "validation_client_name": "client-validator",
     "client_key": "/tmp/packer_client.pem",
     "skip_clean_client": "true"
      }]
 }
install_command
Provided chef url to install chef-client inside machine.
run_list
Provide your base_image cookbook recipe name to run
Trigger Packer through Jenkins
Download and install packer on your Jenkins server and Create a “packer” folder and upload base_image.json file on your Github Repository.
Create a simple Jenkins Job as shown
Add your GitHub Repository URL and Credentails

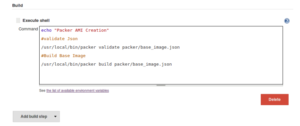
Add Build Step


