Since the release of Apache Spark, it has been meeting the expectations of organizations in a great way when it comes to querying, data processing, and generating analytics reports quickly. It is one of the most popular Big Data frameworks that can be used for data processing. With its in-memory computation capability, it has become one of the fastest data processing engines. Also known as the 3G for Big Data.
In this blog, I will take you through the process of setting up a local standalone Spark cluster. I’ll also talk about how to start and stop the cluster. You will also find out how to submit the Spark application to this cluster and submit jobs interactively using the spark-shell feature.
What is Apache Spark?
It is an open-source distributed computing framework for processing large volumes of data. Capable of batch and real-time processing it provides high-level APIs in Java, Scala, Python, and R for writing driver programs. Spark also provides a higher level of components that includes Spark SQL for SQL structured data, Spark MLlib for machine learning, GraphX for graph processing. Also has Spark Streaming for data stream processing using DStreams (old API) and Structured Streaming for structured data stream processing that uses Datasets and Dataframes (newer API than DStreams).
Prerequisites For Apache Spark
Apache Spark is developed using Java and Scala languages. A compatible Java virtual machine (JVM) is sufficient to launch the Spark Standalone cluster and run the Spark applications. To run the applications written in Python or R, additional installations are required. We have gathered the following information regarding the supported JVM and languages from Apache Spark official page(https://spark.apache.org/docs/latest/).
| Language | Version | Important Notes |
| Java | Java 8/11 | It should be either installed in the system PATH or the JAVA_HOME must be pointing to the java installation directory.Support for Java 8 versions prior to 8u92 have been deprecated from Spark 3.0.0 onwards.For Java 11, -Dio.netty.tryReflectionSetAccessible=true is required for using Apache Arrow Library. |
| Scala | Scala 2.11/2.12 | Requires compatible Scala versions according to the distribution. |
| Python | Python 3.6+ | Please refer to the latest Python Compatibility page for Apache Arrow. |
| R | R 3.5+ |
Local Installation
We will create a local installation that is sufficient enough to launch a small Spark Standalone cluster and run jobs on small datasets using a single machine. The cluster will be able to run Spark applications written in Java/Scala.
Check the correct installation of java 8/11.
Download the Apache Spark distribution file from the Apache Spark downloads page.
Extract the file using the tar command.
Go to the spark home directory.
After this, let’s launch the standalone cluster.
Launch The Standalone Cluster
The standalone cluster mode has a master-slave architecture. It consists of master and slave processes to run the Spark application. The master acts as a resource manager for the cluster. It accepts the applications and schedules resources to run those applications. The workers are responsible for launching executors for task execution.
We will first launch the master process and then will launch the worker process.
Launch the master process
The master process is identified by the SPARK_MASTER_HOST and the SPARK_MASTER_PORT. These values should exactly match while the worker process is registered in the cluster and the job is submitted to the Spark cluster.
SPARK_MASTER_HOST: It can be a DNS, hostname, or IP address. The default value is the machine’s hostname.
SPARK_MASTER_PORT: It is the port number to communicate with the master process. The default value is 7077.
The SPARK_MASTER_HOST can be changed by updating the system’s environment variable. Use the following command to set SPARK_MASTER_HOST as localhost.
Use the following command to start the master process.
To view the Spark Web UI, open a web browser and go to http://localhost:8080.
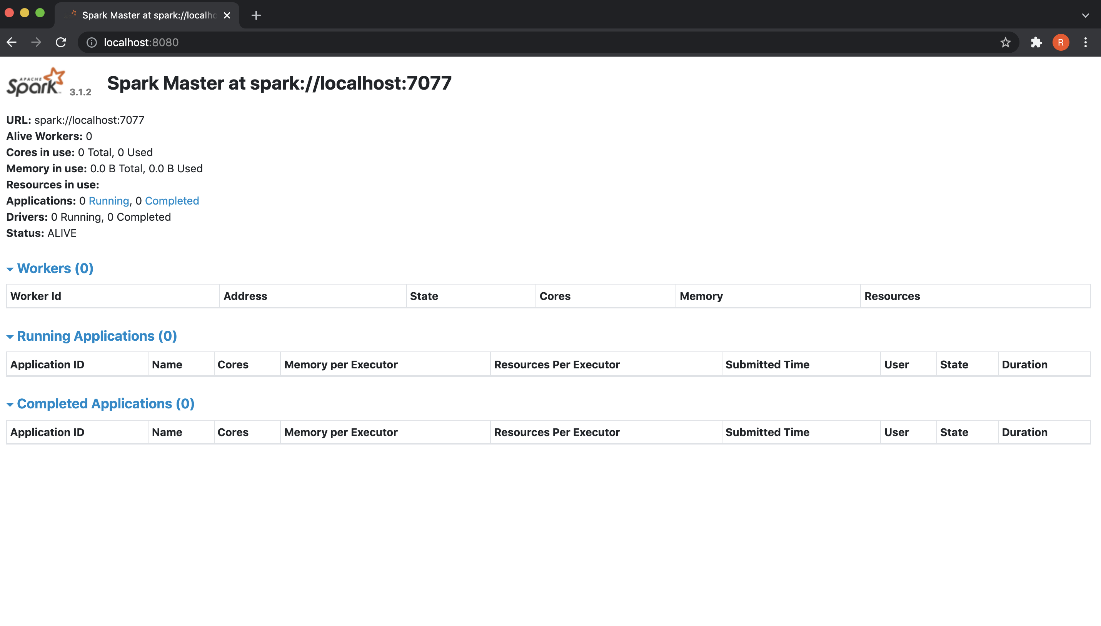
Launch the worker process
The worker process launches the executors for task executions. The actual processing of data in distributed manner occurs in these executors.
The worker process can start with or without specifying the number of resources. When resources are not specified, workers utilize the maximum resources of the running environment.
1) To start the worker process with maximum resources, use the following command template.
Use the below command to register the worker to the master url localhost:7077
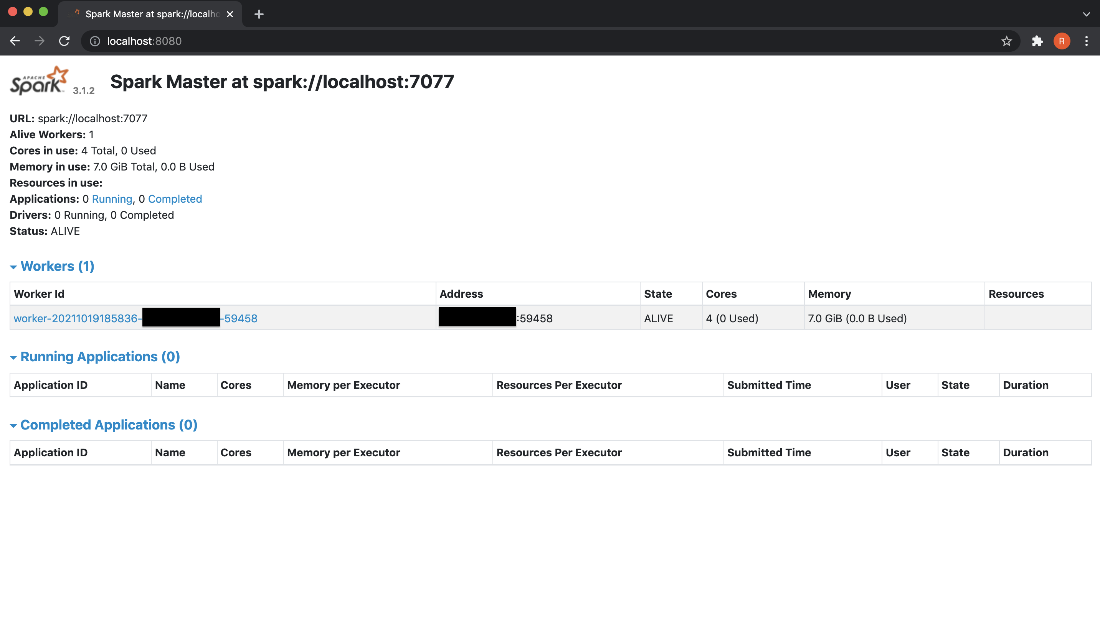
2) To allocate a certain amount of resources to the slave, use ‘-c’ option for specifying number of cores and ‘-m’ option for specifying memory.
The following command allocates 2 cores and 1GB memory to the worker. To specify memory in gigabytes, use G and for megabytes use M.
After launching the standalone cluster, let’s move to the next step of running the applications.
Running Applications With Spark-Submit
Spark applications are mostly submitted by using the spark-submit command.
Some of the commonly used options are:
- –class: It is the entry point for application (e.g. org.apache.spark.examples.SparkPi)
- –master: It is the master url for the cluster (e.g. spark://localhost:7077)
- –deploy-mode: To deploy the driver on the worker nodes (cluster) or locally as an external client (client) (default: client)
- –conf: Arbitrary Spark configuration property in key=value format. For values that contain spaces wrap “key=value” in quotes (as shown). Multiple configurations should be passed as separate arguments. (e.g. –conf <key>=<value> –conf <key2>=<value2>)
- application-jar: Path to a bundled jar including your application and all dependencies. The URL must be globally visible inside of your cluster, for instance, an hdfs:// path or a file:// path that is present on all nodes.
- application-arguments: Arguments passed to the main method of your main class, if any.
Apache Spark provides a number of example applications for understanding the API. Use the following command to run an application that uses Monte Carlo method to calculate the value of Pi. The value of Pi is calculated using 10000 random points, in this example.
The running application can be monitored in the Jobs WebUI http://localhost:4040. This UI is available till the application is running.
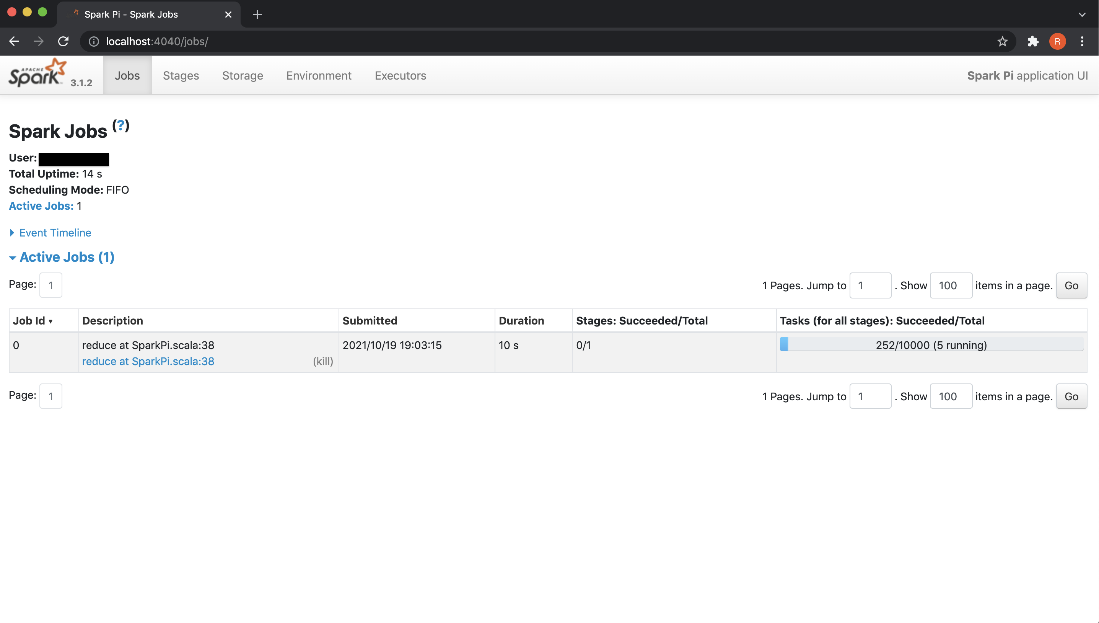
The calculated value of Pi is printed in the logs of our application.

The running and completed applications are listed in the Spark WebUI (http://localhost:8080).
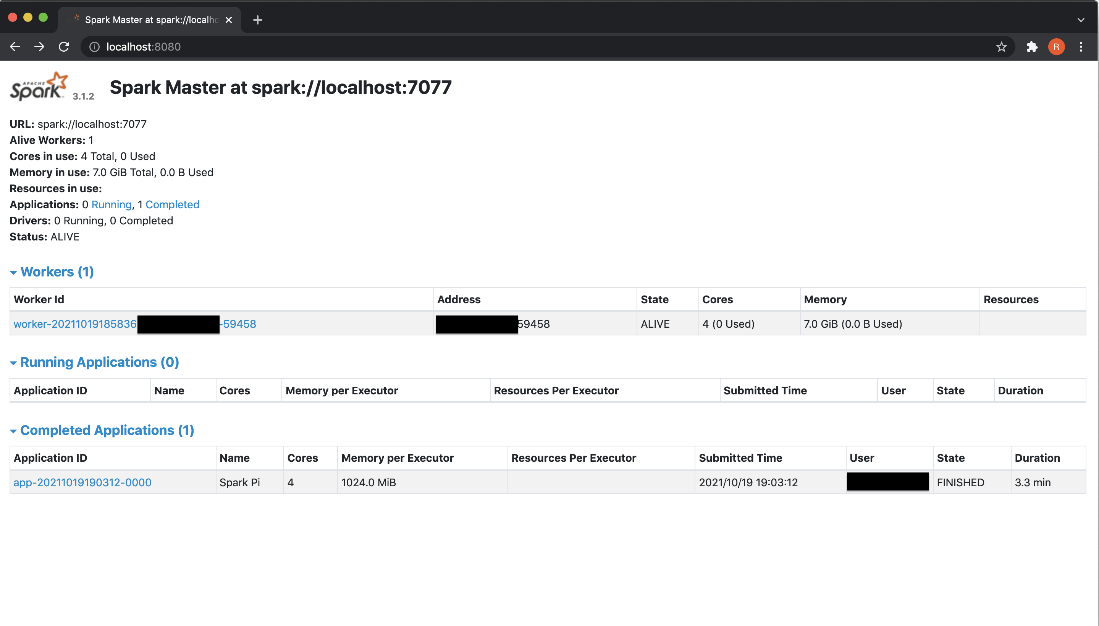
Spark-Shell
Apache Spark has provided this feature to write Scala programs interactively. This feature is extremely helpful for understanding the Spark API as well as analyzing the data interactively.
Local mode and cluster mode
The spark-shell can run on local mode or cluster mode. In local mode, it doesn’t depend on the Spark cluster. In cluster mode, it will use the resources.
1) To run spark-shell on local mode, run the following command.
2) To run spark on a local master with a specific number of cores, run the following command.
3) To run spark application in cluster mode on an existing spark cluster, use the following command.
Now, in the next section, we will run the spark jobs with spark-shell.
Running Spark Jobs Using Spark-Shell
Let’s learn how to use the aprk-shell.We will launch the spark-shell and submit jobs interactively.
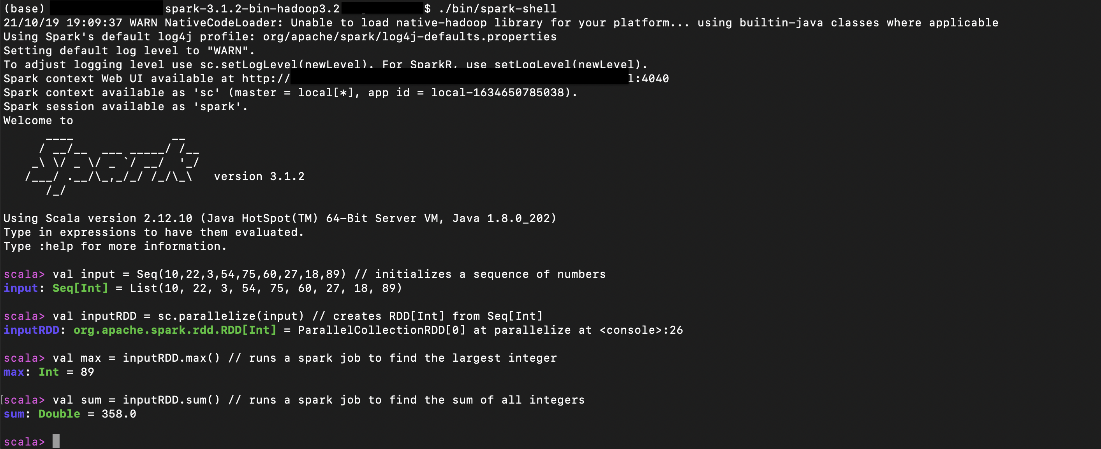
Start the spark-shell in local mode
Once the spark-shell application is initialized properly, the jobs can be submitted interactively.
Our example initializes an RDD of integers and then runs the jobs on it to find out their max and sum.
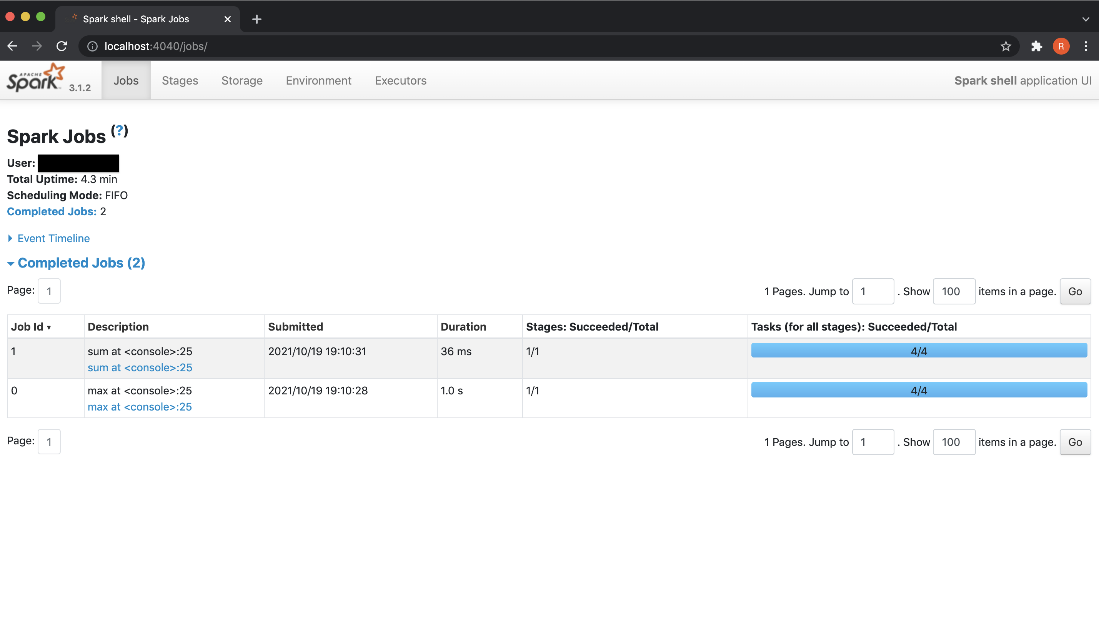
The WebUI also shows the list of jobs submitted through spark-shell.
Next, we will terminate the cluster.
Terminate The Standalone Cluster
The cluster can be terminated by stopping the worker and master processes.
Terminate the worker process
To remove the worker from the cluster, terminate the worker process using the following command.
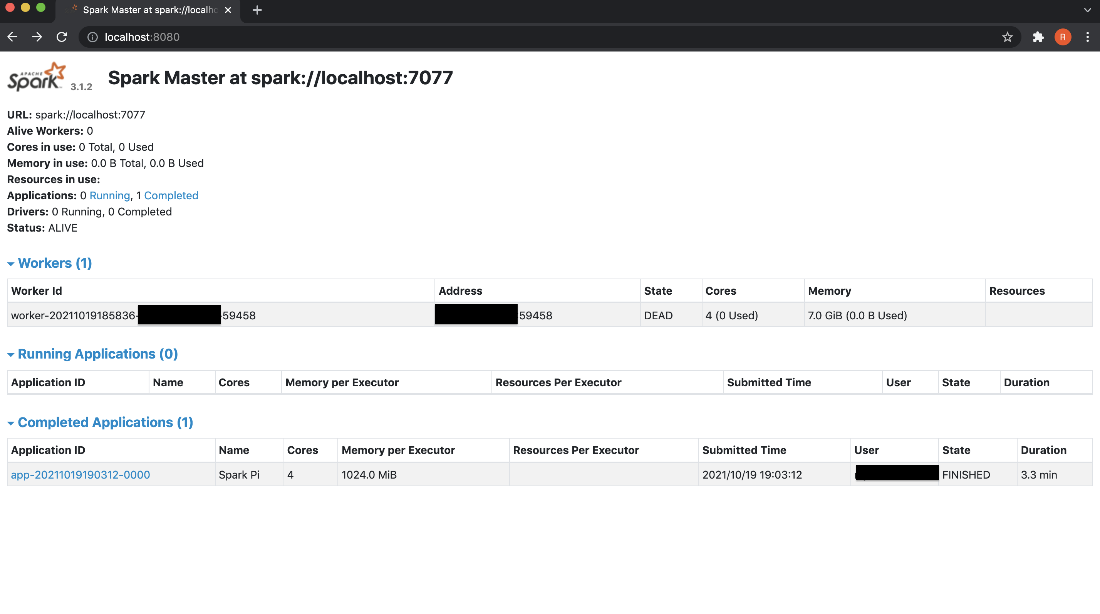
The status of the stopped worker is shown as DEAD.
Terminate the master process
In order to bring down the Spark Standalone cluster, terminate the master process using the following command.
Conclusion:
In this blog, I tried to capture some basic information about spinning up a local Spark cluster along with running and monitoring applications in it. This local setup will help you to explore the features of Spark API. It will also provide a small environment for testing your Spark applications before deploying them in an actual production environment. Do try this process and share your experience with us. Till then, stay safe and happy coding!


